AoA (global) was permanently shut down long ago, this site will remain up since it may prove useful to international players still playing in CAOA (chinese version, still up).
If you are having issues installing/patching the game (v0.36 or v0.37 client), you need a new patchbase file, which you can get in this link (AoA official forums).
If that link doesn't work, you can find a backup of the file here (this blog).
Mysticrai has made an AoA fansite, it is currently under development, but contains a copy of the patchbase.ini file, downloadable through dropbox. His site can be found here.
A fan forum, made by Midnight_Wolfie, can be found here.
1) Welcome
2) Player Stats
3) Armor Parts' Colors
4) Choosing Armor Parts To Use 5) Weapons
6) Equipping Enhancer/Skill Chips & Adding/Creating Slots
7) Upgrading Chips and Armor Parts
8) Parts Reconfiguration
9) "Frags"
10) Minning
11) Save Your Reset Pills
12) Builds
13) Transforming
14) Instance Maps
15) Armor & Weapon Combining (not finished)
16) Maps
17) Monster Map
18) Capped Stats for Reconfigured Parts
19) Rank 4 Skill Chips Database
List of game-related guides here (some links 404'd).
. Link is down since the forums were updated.
Google Language Tools (online translator)
Other online translators
April 22, 2020

January 1, 2011
Fix for the v0.37 "unable to connect" launcher bug.
This is a backup of the thread I made in the official forums (in case they get replaced).
For those having issues installing the game
I believe I may have found a possible fix for the error message that shows up when trying to patch/update the v0.37 client, which says:
"Can not connect the update server, please your network connections and whether be allowed to visit the FTP server, if you confirm your network is ok, please click the set button manually to select another server to update!"
I just tested it on a clean installation and it worked.
Steps:
1) Browse to your AoA Folder
2) Open the PatchBase.ini file with notepad or any text editor
3) Delete everything inside it
4) Copy and paste these following lines into your empty PatchBase.ini file:
[info]
title = AOA
version = 0.1
webpage=http://aoa.us.woniu.com/aoa.html
ClientSrv=http://aoa.us.woniu.com
PlayerPub=http://bbs.us.woniu.com
CountApply=http://member.us.woniu.com
Fee=
retrytimes£½5
GameInfo=AOA Open Beta Test #1.0.
regtabid=AOA
[ftp]
num = 2
name0 = AOA Open Beta Test Server
server0 = 64.62.148.219
port0 = 9021
versionserver0 = 64.62.148.219
versionport0 = 9121
downtype0=ftp
name1 = AOA Open Beta Test Server
server1 = 64.62.148.219
port1 = 9021
versionserver1 = 64.62.148.219
versionport1 = 9121
downtype1=ftp
5) Save the changes and close notepad or your text editor
6) Run the game.
For those having issues installing the game
I believe I may have found a possible fix for the error message that shows up when trying to patch/update the v0.37 client, which says:
"Can not connect the update server, please your network connections and whether be allowed to visit the FTP server, if you confirm your network is ok, please click the set button manually to select another server to update!"
I just tested it on a clean installation and it worked.
Steps:
1) Browse to your AoA Folder
2) Open the PatchBase.ini file with notepad or any text editor
3) Delete everything inside it
4) Copy and paste these following lines into your empty PatchBase.ini file:
[info]
title = AOA
version = 0.1
webpage=http://aoa.us.woniu.com/aoa.html
ClientSrv=http://aoa.us.woniu.com
PlayerPub=http://bbs.us.woniu.com
CountApply=http://member.us.woniu.com
Fee=
retrytimes£½5
GameInfo=AOA Open Beta Test #1.0.
regtabid=AOA
[ftp]
num = 2
name0 = AOA Open Beta Test Server
server0 = 64.62.148.219
port0 = 9021
versionserver0 = 64.62.148.219
versionport0 = 9121
downtype0=ftp
name1 = AOA Open Beta Test Server
server1 = 64.62.148.219
port1 = 9021
versionserver1 = 64.62.148.219
versionport1 = 9121
downtype1=ftp
5) Save the changes and close notepad or your text editor
6) Run the game.
April 22, 2008
Max Blue Stats for Reconfigured Parts
This is some info I could gather with the caps for the most useful blue stats found in game, and some others which are not as useful, but used frequently anyways.
Armor Parts' blue stats:
- Armor/Energy Shield/Shield Durability = + 2000
- Body/Arm/Leg/Head Armor/Energy Shield Durability = + 150%
- Armor Detecting/Locking Range = +30 (separate parts with either stat, both have the same cap)
- Attack Range of Combat Weapon = +6
- Attack Interval of Hand Weapons = -35%
- Attack Interval of Shoulder Missile = -35%
- Armor/Energy Shield Resistance = +30
- Critical Strike Rate = +14
- Damage of Shoulder Missile = +1.4
- Detecting and Locking Range = +25 (these are single parts that come with both detect and lock range)
- Error of Weapon Scanning = -75%
- Explosion Range of Explosive Weapons = +15
- Fire Range of Shooting Weapon = +30
- Hitpoints = +100%
- Hitpoints of Combat/Shooting Weapon = +1000 (flat damage)
- Hitpoints of Combat/Shooting Weapon % = +150%
- Moving Speed = +3 (affects both walking and sliding/flying speed)
- Radar Reflection = -35%
- Shield Block = +65
- Shield Resistance = +45
- Sliding Speed of Armor = +3 (only affects sliding/flying speed)
- Speed of Armor = +2.5 (only affects walking speed)
Transform Module's blue stats:
The caps on these stats are rather high, I have never seen a mod, including the cash shop ones, reach these values.
- Armor/Energy Shield/Shield Durability = +5000
- Arm/Body/Head/Leg/ Armor/Energy Shield/Shield Durability % = +250%
- Weapon Power = +2500 (flat)
- Weapon Power = +300%
Armor Parts' blue stats:
- Armor/Energy Shield/Shield Durability = + 2000
- Body/Arm/Leg/Head Armor/Energy Shield Durability = + 150%
- Armor Detecting/Locking Range = +30 (separate parts with either stat, both have the same cap)
- Attack Range of Combat Weapon = +6
- Attack Interval of Hand Weapons = -35%
- Attack Interval of Shoulder Missile = -35%
- Armor/Energy Shield Resistance = +30
- Critical Strike Rate = +14
- Damage of Shoulder Missile = +1.4
- Detecting and Locking Range = +25 (these are single parts that come with both detect and lock range)
- Error of Weapon Scanning = -75%
- Explosion Range of Explosive Weapons = +15
- Fire Range of Shooting Weapon = +30
- Hitpoints = +100%
- Hitpoints of Combat/Shooting Weapon = +1000 (flat damage)
- Hitpoints of Combat/Shooting Weapon % = +150%
- Moving Speed = +3 (affects both walking and sliding/flying speed)
- Radar Reflection = -35%
- Shield Block = +65
- Shield Resistance = +45
- Sliding Speed of Armor = +3 (only affects sliding/flying speed)
- Speed of Armor = +2.5 (only affects walking speed)
Transform Module's blue stats:
The caps on these stats are rather high, I have never seen a mod, including the cash shop ones, reach these values.
- Armor/Energy Shield/Shield Durability = +5000
- Arm/Body/Head/Leg/ Armor/Energy Shield/Shield Durability % = +250%
- Weapon Power = +2500 (flat)
- Weapon Power = +300%
Some info on armor & weapon combining
This section of the guide deals with weapon and armor combining, adding secondary ranks/upgrades, and slotting rank 19 armor parts.
________________________________________________
________________________________________________
Weapon Combining:
This process is done in any city in Battle Planet, except for the base cities (Andrew and Ganars). Its performed through the Composing Service Provider npcs, the option is called Weapon Composing, and the interface looks like this:

In order to combine a weapon, you need 1 of the 3 Weapon Composing Optimization cs chips (20%, 50% or 100% success rate) and 2 weapons of the same rank to get one of a higher rank. Weapons start at rank 0, so you would need 2 rank 0s to make a 1, 2 rank 1s to make a 2, and so on. For most weapons, if not all, the weapon's damage, energy consumption per regular shot, CI requirements & range increase, while interval modifications depend on the weapon type. Regarding Endgame 2h weapons, till rank 5 or so, as far as I remember:
- lasers become stronger but VERY slow, becoming 2nd in highest damage per hit, after particle cannons
- canisters keep their speed, but the lowest damage increase of all 2h type weapons
- cartridge guns become similar to lasers, this means high damage but VERY slow speed
- emag guns keep their speed, but become slightly weaker per shot than lasers & cartridge weapons (stronger than canisters though)
- part guns get huge damage increase, and also become faster.
- missiles get almost worthless stats (tiny damage increases, around 0.1 per rank, and -100 interval)
- axes & swords keep their speed, but get the worst damage bonuses (r5 axe is weaker than r3 laser, which is weaker than r0 particle...). Their critical chance goes up, but its outdamaged by r3 ammo anyways.
After ranking, dph: particle > laser > cartridge > emag > canister
Firing speed: emag = canister > cartridge > laser > particle
Finally, dps (what actually matters): particle = laser = cartridge = emag > canister
As for Endgame dual type weapons, I think:
- all but emag & particle keep their speed & get crappy damage increase
- emag & particle also get crappy damage increase, but become way faster.
Also, epic type weapons gain a bonus to critical damage after rank 3, this only applies if you are using other critical hit parts in your build. And since the new patch, they seem to be obtaining an additional damage bonus as well (from all builds, I believe).
Most weapons will also earn 1 additional active skill, though I don't know if those skills actually work.
________________________________________________
________________________________________________
________________________________________________
________________________________________________
Armor Combining is performed through an npc called High Composing Service Provider. Since this npc talks in Engrish as well, translating whatever it said wasnt easy, so the information below may not be accurate. Anyways, this npc has 5 options:
________________________________________________
________________________________________________
Parts Composition:
This is the one that allows you to combine armor parts.
 You need:
- a gray/blue rank 19 part (must be either from the Executioner, Moloch or Night set)
- a part you want to combine to the rank 19 one (can be any rank)
- a cash shop Composing Chip of the same rank as that last part.
Eg:
- Obtain a Rank 19 part (of the rank 19 set) + a rank 17 part + rank 17 Composing Chip.
- The rank 19 part goes in the main slot.
- The rank 17 one goes in the 2nd slot.
- The rank 17 Composing Chip goes in the 3rd slot.
- Click the lever thing, and done.
The new combined part will have both stats (if the rank 19 was blue). The original stats from the rank 19 one will remain static, while the new blue stat (transferred from your other part) will continue to increase when ranked up (not with frags, its a different process for these parts, and requires Cash Shop usage as well).
There are a few things to take into account:
- If you combine the rank 19 set part, to a lower rank part, you ll need to apply the knowledge points required to use rank 19 parts. The outcome part however will be of whatever rank the lower part was. So r14 part + r19 set part = r14 part with rank 19 stats & requirements.
- After combining, only the new blue stat will change when you rank the part, all other stats, including the white ones, will remain the same.
- If you combine a rank 19 set part to a higher rank part, which had more durability, then you LOSE that durability, and will be stuck with the rank 19 set part's one. Basically, r22 part + r19 set part = rank 22 part with rank 22 requirements but rank 19 set stats. This is something enhanceds needs to consider, since the Moloch Set got the worst durability bonus of all. Night body gets ~2.3k armor, thats a +~1k increase when compared to any reconfigured r19 neo body; Executioner gets ~2.6k armor, which is +~700 when compared to any reconfigured r19 nat body; but Moloch only gets ~2.7k armor, which is about as much dur as any other reconfigured r19 enh body (+0 bonus), and -1k by endgame (r25 huge lizard bodies get around 3.6k armor dur, so enhanceds get the worst durability bonuses with armor combining, followed by nat humans, whose r25 observer bodies are at around 2.4k dur).
________________________________________________
________________________________________________
Parts Transformation:
This option is a reconfiguration interface for the combined rank 19 parts. The combined armor part goes on the lone slot on top, and once you place it there, the interface will display the type of Nemo Crystal needed in order to rank the part up. You only need to have the crystal in your inventory, and its consumed automatically when you press the Reconfigure button (in a similar fashion to Dismantling Tools).

The Nemo Crystals are available in the Ingame Cash Shop (they range from "Nemo Crystal A type I" to "Nemo Crystal C type IV", I believe). Which means that if you combine, say, a rank 15 part to a rank 19 part, you ll have to spend real life money in order to rank it up (to buy the crystals). If you combine a rank 25 (25 is max rank possible) to the rank 19 part, then you would have the max rank already, so no money wasted on crystals. However, the cost of Combining Chips raises as the part's rank raises as well. In any case, I believe its actually cheaper to combine a part once its at rank 25 (it costs about 46xx CS points), than to rank it up from any lower rank, since the last 6 or so ranks (from 18 or 19 to 25) cost over 1.5k points each in Nemo Crystals.
________________________________________________
________________________________________________
Parts Transplant:
This is a continuation for the first option. Its used to replace the rank 19's "original" blue stat (the one that the rank 19 part had before being combined with another part, if any) for stats belonging to a purple rank 19 part.

Eg:
- Obtain a "Clean" Blue Rank 19 part (for this example, it has + 10% Armor Dur).
- Combine it with a rank 17 part (for this example, it has +22 Armor Res) through the Parts Composition option (uses Composing Chip).
- The rank 19 part has now + 10% Armor Dur (its original stat, it ll remain static) & +22 Armor Res (its new stat, which will increase when you rank it up).
- Open the Parts Transplant interface.
- Place your combined (2 stat) Rank 19 part in the Auxiliary Devices slot.
- Place a purple rank 19 part (for example, it has +40% hitpoints and +12 Armor Heat Resistance) in the Main Devices slot.
- Place a Transplant Chip (from the Cash Shop) in the Transplantation Chip slot.
- Pull the lever.
- You obtain a new purple rank 19 part, which has the blue (reconfigurable) stat from your combined rank 19 part, and the 2 stats from the purple part (for this example, +22 Armor Res, +40% hitpoints, and +12 Armor Heat Resistance).
________________________________________________
________________________________________________
Material Composing:
This is an interface to combine the Nemo Crystals from the Cash Shop (eg, combine some "Nemo Crystal C type IV" to make a "Nemo Crystal C type V").

The description says that the "materials" (never heard of "materials", I guess its the Nemo Crystals) can go in any of the 5 slots, but that you also need to click on the numbers above to select the numbers of materials to be synthesized, AND that each number will make different results (wtf?).
The next paragraph almost gave me a headache, some of the symbols aren't even in standard ASCII (found out they are extended ASCII though). I reads:
"The best is to have the Material ¢¦ and the product will be displayed in the Product Slot in the down part."
Rofl. Anyways, there is no actual Product Slot (the bottom slot reads "Compositing Material" if you hover the mouse over it), and I have honestly no idea of what a ¢¦ is either.
I figured that the process is:
- Put 2 to 5 cs Nemo Crystals in the material fields.
- Interpret "different results" as "different success rates" (like when combining chips).
- Click the button with the number corresponding to the amount of crystals you wish to use.
- Higher rank crystal will (or will not, depending on success rate) appear in the slot at the bottom.
That ^ is all theory anyways. For all I know, it could be a virtual soda vending machine. Those were you put some coins in the slot, push the number/button of the drink you want, and it ll come out through the opening "in the down part".
________________________________________________
________________________________________________________________________________________________
________________________________________________
Upgrading of the Equipment:
This function adds a secondary ranking system to your r19 combined parts, & to your ranked weapons as well.
- Drop the the part/weapon in the middle slot
- Drop some Advance Upgrading Crystals (they drop in DV instances) in the slots around it
- Click the button above specifying how many of these crystals you want to consume.
The lines in red at the bottom of the description contain a warning explaining that if the process fails, then the weapon/part will lose some (secondary) ranks, and the higher the rank it is, then the more ranks it will lose if it fails. Pic:

There is an item called Gold Stable Chip in the Cash Shop, which I believe adds 5% success rate. In the Cash Shop can also be found another version of the crystals, meant for parts whose secondary rank is above 10.
For weapons, the secondary rank increases their Hitpoints (base damage), while for armor parts, it improves both their Armor and Energy Shield Durability (credits to Myr for clarifying this info).
________________________________________________
________________________________________________________________________________________________
________________________________________________
Adding slots & more attributes to your (preferably rank 19) parts:
The Amplitude Organ Service Dealer npc allows you to further improve the quality of your parts. This means, it enables to you to create additional slots to your Head, Body, Arms and Legs, where you can place Amplitude Organs (the organs are currently being dropped by all Assault type bosses, credits to Myr for that info). These organs give additional bonuses to your durability (either armor or energy shield), and damage (either shooting or combat). This npc has 4 options, detailed below.
________________________________________________
________________________________________________
Turn on the Organ Notch:
This option allows you to create additional slots to your arm, leg, head or body. Since ultimately you will be aiming for rank 19 combined purple parts, its better to add slots to those. The interface is quite self explanatory:

You just drop the part in the slot to the left, an Incision and Notch Tool (currently obtainable from the Treasure Boxes type 2/AoA Vip boxes type 2) in the slot to the right, and click the Confirm button. Type 1 tools create the first slot, type 2 tools create the second one, and so on, up to 5 slots (only 1st slot is currently available ingame).
________________________________________________
________________________________________________
Amplitude Organ Composing:
This option, similar to the chips/crystals composing one, allows you to combine several Amplitude Organs to reach one of a higher rank.

As in the other cases, you place up to 5 organs (varying success rate) in the slots, click the Compound button, and done.
________________________________________________
________________________________________________
Amplitude Organ Socketing Embeding:
Similar to the cabin/core socketing function, this interface allows you to place the organs inside the slotted parts.

In a similar fashion to the other socketing interface, you place the part in the lone slot to the left, while filling the grid with the organs.
________________________________________________
________________________________________________
Amplitude Organ is Dismantled:
As its name indicates, this option allows you to remove organs from the part.

- Place the part in the top left slot.
- Place a Dismantling Organ Tool (currently obtainable from the Treasure Boxes type 2/AoA VIP boxes type 2, credits to Myr for that info) in the top right slot.
- Click the Confirm button.
I believe there is a % based chance that the removed organ(s) will be destroyed, as well as the slot they occupied.
________________________________________________
________________________________________________
Weapon Combining:
This process is done in any city in Battle Planet, except for the base cities (Andrew and Ganars). Its performed through the Composing Service Provider npcs, the option is called Weapon Composing, and the interface looks like this:

In order to combine a weapon, you need 1 of the 3 Weapon Composing Optimization cs chips (20%, 50% or 100% success rate) and 2 weapons of the same rank to get one of a higher rank. Weapons start at rank 0, so you would need 2 rank 0s to make a 1, 2 rank 1s to make a 2, and so on. For most weapons, if not all, the weapon's damage, energy consumption per regular shot, CI requirements & range increase, while interval modifications depend on the weapon type. Regarding Endgame 2h weapons, till rank 5 or so, as far as I remember:
- lasers become stronger but VERY slow, becoming 2nd in highest damage per hit, after particle cannons
- canisters keep their speed, but the lowest damage increase of all 2h type weapons
- cartridge guns become similar to lasers, this means high damage but VERY slow speed
- emag guns keep their speed, but become slightly weaker per shot than lasers & cartridge weapons (stronger than canisters though)
- part guns get huge damage increase, and also become faster.
- missiles get almost worthless stats (tiny damage increases, around 0.1 per rank, and -100 interval)
- axes & swords keep their speed, but get the worst damage bonuses (r5 axe is weaker than r3 laser, which is weaker than r0 particle...). Their critical chance goes up, but its outdamaged by r3 ammo anyways.
After ranking, dph: particle > laser > cartridge > emag > canister
Firing speed: emag = canister > cartridge > laser > particle
Finally, dps (what actually matters): particle = laser = cartridge = emag > canister
As for Endgame dual type weapons, I think:
- all but emag & particle keep their speed & get crappy damage increase
- emag & particle also get crappy damage increase, but become way faster.
Also, epic type weapons gain a bonus to critical damage after rank 3, this only applies if you are using other critical hit parts in your build. And since the new patch, they seem to be obtaining an additional damage bonus as well (from all builds, I believe).
Most weapons will also earn 1 additional active skill, though I don't know if those skills actually work.
________________________________________________
________________________________________________
________________________________________________
________________________________________________
Armor Combining is performed through an npc called High Composing Service Provider. Since this npc talks in Engrish as well, translating whatever it said wasnt easy, so the information below may not be accurate. Anyways, this npc has 5 options:
________________________________________________
________________________________________________
Parts Composition:
This is the one that allows you to combine armor parts.
 You need:
- a gray/blue rank 19 part (must be either from the Executioner, Moloch or Night set)
- a part you want to combine to the rank 19 one (can be any rank)
- a cash shop Composing Chip of the same rank as that last part.
Eg:
- Obtain a Rank 19 part (of the rank 19 set) + a rank 17 part + rank 17 Composing Chip.
- The rank 19 part goes in the main slot.
- The rank 17 one goes in the 2nd slot.
- The rank 17 Composing Chip goes in the 3rd slot.
- Click the lever thing, and done.
The new combined part will have both stats (if the rank 19 was blue). The original stats from the rank 19 one will remain static, while the new blue stat (transferred from your other part) will continue to increase when ranked up (not with frags, its a different process for these parts, and requires Cash Shop usage as well).
There are a few things to take into account:
- If you combine the rank 19 set part, to a lower rank part, you ll need to apply the knowledge points required to use rank 19 parts. The outcome part however will be of whatever rank the lower part was. So r14 part + r19 set part = r14 part with rank 19 stats & requirements.
- After combining, only the new blue stat will change when you rank the part, all other stats, including the white ones, will remain the same.
- If you combine a rank 19 set part to a higher rank part, which had more durability, then you LOSE that durability, and will be stuck with the rank 19 set part's one. Basically, r22 part + r19 set part = rank 22 part with rank 22 requirements but rank 19 set stats. This is something enhanceds needs to consider, since the Moloch Set got the worst durability bonus of all. Night body gets ~2.3k armor, thats a +~1k increase when compared to any reconfigured r19 neo body; Executioner gets ~2.6k armor, which is +~700 when compared to any reconfigured r19 nat body; but Moloch only gets ~2.7k armor, which is about as much dur as any other reconfigured r19 enh body (+0 bonus), and -1k by endgame (r25 huge lizard bodies get around 3.6k armor dur, so enhanceds get the worst durability bonuses with armor combining, followed by nat humans, whose r25 observer bodies are at around 2.4k dur).
________________________________________________
________________________________________________
Parts Transformation:
This option is a reconfiguration interface for the combined rank 19 parts. The combined armor part goes on the lone slot on top, and once you place it there, the interface will display the type of Nemo Crystal needed in order to rank the part up. You only need to have the crystal in your inventory, and its consumed automatically when you press the Reconfigure button (in a similar fashion to Dismantling Tools).

The Nemo Crystals are available in the Ingame Cash Shop (they range from "Nemo Crystal A type I" to "Nemo Crystal C type IV", I believe). Which means that if you combine, say, a rank 15 part to a rank 19 part, you ll have to spend real life money in order to rank it up (to buy the crystals). If you combine a rank 25 (25 is max rank possible) to the rank 19 part, then you would have the max rank already, so no money wasted on crystals. However, the cost of Combining Chips raises as the part's rank raises as well. In any case, I believe its actually cheaper to combine a part once its at rank 25 (it costs about 46xx CS points), than to rank it up from any lower rank, since the last 6 or so ranks (from 18 or 19 to 25) cost over 1.5k points each in Nemo Crystals.
________________________________________________
________________________________________________
Parts Transplant:
This is a continuation for the first option. Its used to replace the rank 19's "original" blue stat (the one that the rank 19 part had before being combined with another part, if any) for stats belonging to a purple rank 19 part.

Eg:
- Obtain a "Clean" Blue Rank 19 part (for this example, it has + 10% Armor Dur).
- Combine it with a rank 17 part (for this example, it has +22 Armor Res) through the Parts Composition option (uses Composing Chip).
- The rank 19 part has now + 10% Armor Dur (its original stat, it ll remain static) & +22 Armor Res (its new stat, which will increase when you rank it up).
- Open the Parts Transplant interface.
- Place your combined (2 stat) Rank 19 part in the Auxiliary Devices slot.
- Place a purple rank 19 part (for example, it has +40% hitpoints and +12 Armor Heat Resistance) in the Main Devices slot.
- Place a Transplant Chip (from the Cash Shop) in the Transplantation Chip slot.
- Pull the lever.
- You obtain a new purple rank 19 part, which has the blue (reconfigurable) stat from your combined rank 19 part, and the 2 stats from the purple part (for this example, +22 Armor Res, +40% hitpoints, and +12 Armor Heat Resistance).
________________________________________________
________________________________________________
Material Composing:
This is an interface to combine the Nemo Crystals from the Cash Shop (eg, combine some "Nemo Crystal C type IV" to make a "Nemo Crystal C type V").

The description says that the "materials" (never heard of "materials", I guess its the Nemo Crystals) can go in any of the 5 slots, but that you also need to click on the numbers above to select the numbers of materials to be synthesized, AND that each number will make different results (wtf?).
The next paragraph almost gave me a headache, some of the symbols aren't even in standard ASCII (found out they are extended ASCII though). I reads:
"The best is to have the Material ¢¦ and the product will be displayed in the Product Slot in the down part."
Rofl. Anyways, there is no actual Product Slot (the bottom slot reads "Compositing Material" if you hover the mouse over it), and I have honestly no idea of what a ¢¦ is either.
I figured that the process is:
- Put 2 to 5 cs Nemo Crystals in the material fields.
- Interpret "different results" as "different success rates" (like when combining chips).
- Click the button with the number corresponding to the amount of crystals you wish to use.
- Higher rank crystal will (or will not, depending on success rate) appear in the slot at the bottom.
That ^ is all theory anyways. For all I know, it could be a virtual soda vending machine. Those were you put some coins in the slot, push the number/button of the drink you want, and it ll come out through the opening "in the down part".
________________________________________________
________________________________________________________________________________________________
________________________________________________
Upgrading of the Equipment:
This function adds a secondary ranking system to your r19 combined parts, & to your ranked weapons as well.
- Drop the the part/weapon in the middle slot
- Drop some Advance Upgrading Crystals (they drop in DV instances) in the slots around it
- Click the button above specifying how many of these crystals you want to consume.
The lines in red at the bottom of the description contain a warning explaining that if the process fails, then the weapon/part will lose some (secondary) ranks, and the higher the rank it is, then the more ranks it will lose if it fails. Pic:

There is an item called Gold Stable Chip in the Cash Shop, which I believe adds 5% success rate. In the Cash Shop can also be found another version of the crystals, meant for parts whose secondary rank is above 10.
For weapons, the secondary rank increases their Hitpoints (base damage), while for armor parts, it improves both their Armor and Energy Shield Durability (credits to Myr for clarifying this info).
________________________________________________
________________________________________________________________________________________________
________________________________________________
Adding slots & more attributes to your (preferably rank 19) parts:
The Amplitude Organ Service Dealer npc allows you to further improve the quality of your parts. This means, it enables to you to create additional slots to your Head, Body, Arms and Legs, where you can place Amplitude Organs (the organs are currently being dropped by all Assault type bosses, credits to Myr for that info). These organs give additional bonuses to your durability (either armor or energy shield), and damage (either shooting or combat). This npc has 4 options, detailed below.
________________________________________________
________________________________________________
Turn on the Organ Notch:
This option allows you to create additional slots to your arm, leg, head or body. Since ultimately you will be aiming for rank 19 combined purple parts, its better to add slots to those. The interface is quite self explanatory:

You just drop the part in the slot to the left, an Incision and Notch Tool (currently obtainable from the Treasure Boxes type 2/AoA Vip boxes type 2) in the slot to the right, and click the Confirm button. Type 1 tools create the first slot, type 2 tools create the second one, and so on, up to 5 slots (only 1st slot is currently available ingame).
________________________________________________
________________________________________________
Amplitude Organ Composing:
This option, similar to the chips/crystals composing one, allows you to combine several Amplitude Organs to reach one of a higher rank.

As in the other cases, you place up to 5 organs (varying success rate) in the slots, click the Compound button, and done.
________________________________________________
________________________________________________
Amplitude Organ Socketing Embeding:
Similar to the cabin/core socketing function, this interface allows you to place the organs inside the slotted parts.

In a similar fashion to the other socketing interface, you place the part in the lone slot to the left, while filling the grid with the organs.
________________________________________________
________________________________________________
Amplitude Organ is Dismantled:
As its name indicates, this option allows you to remove organs from the part.

- Place the part in the top left slot.
- Place a Dismantling Organ Tool (currently obtainable from the Treasure Boxes type 2/AoA VIP boxes type 2, credits to Myr for that info) in the top right slot.
- Click the Confirm button.
I believe there is a % based chance that the removed organ(s) will be destroyed, as well as the slot they occupied.
Maps
These are the maps of the current AoA servers, except for DV (which consists of a single valley, with gates to each instance around the middle). I just took the ones here, put them together, and done. You can see the "full screen" version of most of the maps by going to that link and clicking on the map you want, some don't work though. I wrote the map names in bright yellow, and the green lines mark how the maps connect to each other. If there is no green line between 2 maps, it means they aren't connected, even if they show up next to each other. Additionally, you can check this thread, it has all the boss, chest and mine locations for the first 2 servers.
Recruit Base:
This is the first server you will enter when starting a new character. Mars and Earth players can meet in an area called Bourse (its a trading zone, you can access it near the warps at the end of each starting city). They wont be able to pvp or go to the opposite faction's maps though. The entrance to the FB15 instance is in Cargemiller Plains and West Soer Highland.
Earth side:
Domier City is the starting map.

Mars side:
Yeaslis is the starting map. Note that in Osider, the names of the portals are actually wrong (switched around). Credits to the anonymous user that pointed it out.

Ice Planet:
Larmeya is the starting map and the only city in this server. Both Earth and Mars players can see and talk to each other, but not PvP, nor heal each other with Rainbow. The entrance to the FB18 instance map is in Palermo Iceberg Zone. Additionally, there is another map to the right of Element Digging Valley, where the Gold Mines spawn. That map is pretty much identical to Element Digging Valley as well.

Battle Planet:
This is the first PvP server, any player can kill any player (pking people from your own nation is discouraged though), and your corps can siege and take over cities belonging to the opposite faction. The maps Luke and Shadon are missing here, but you can access them through Arcadia Coteau, West Zone Lasia, and Mare Tranquiliatis.
Through Luke, Shadon and Mare Tranquiliatis, you can reach the opposite faction's furthest maps (Lasia and Arcadia).
Earth side:
Starting map is Andrew.

Mars side:
Starting map is Ganars.

Space War:
This is the second PvP server, unlike Battle Planet the "cities" cannot be sieged though. The maps also have a few different gates to access each other (eg, you can access Universe Island from like 2 different gates in Oak Shelter Belt, and then you can access Myphys Planet Belt from other 2 different gates in Universe Island, and so on). The cities only have 1 access point though.
Starting maps are Rian for Earth players, and Sala for Mars players.

I ll update the missing maps (shadon, luke & dark valley) when I get the chance.
Recruit Base:
This is the first server you will enter when starting a new character. Mars and Earth players can meet in an area called Bourse (its a trading zone, you can access it near the warps at the end of each starting city). They wont be able to pvp or go to the opposite faction's maps though. The entrance to the FB15 instance is in Cargemiller Plains and West Soer Highland.
Earth side:
Domier City is the starting map.

Mars side:
Yeaslis is the starting map. Note that in Osider, the names of the portals are actually wrong (switched around). Credits to the anonymous user that pointed it out.

Ice Planet:
Larmeya is the starting map and the only city in this server. Both Earth and Mars players can see and talk to each other, but not PvP, nor heal each other with Rainbow. The entrance to the FB18 instance map is in Palermo Iceberg Zone. Additionally, there is another map to the right of Element Digging Valley, where the Gold Mines spawn. That map is pretty much identical to Element Digging Valley as well.

Battle Planet:
This is the first PvP server, any player can kill any player (pking people from your own nation is discouraged though), and your corps can siege and take over cities belonging to the opposite faction. The maps Luke and Shadon are missing here, but you can access them through Arcadia Coteau, West Zone Lasia, and Mare Tranquiliatis.
Through Luke, Shadon and Mare Tranquiliatis, you can reach the opposite faction's furthest maps (Lasia and Arcadia).
Earth side:
Starting map is Andrew.

Mars side:
Starting map is Ganars.

Space War:
This is the second PvP server, unlike Battle Planet the "cities" cannot be sieged though. The maps also have a few different gates to access each other (eg, you can access Universe Island from like 2 different gates in Oak Shelter Belt, and then you can access Myphys Planet Belt from other 2 different gates in Universe Island, and so on). The cities only have 1 access point though.
Starting maps are Rian for Earth players, and Sala for Mars players.

I ll update the missing maps (shadon, luke & dark valley) when I get the chance.
New Guide
.[sarcasm]
This Guide is not a joke, but a sad, sad fact. It explains, more or less, everything you are expected to do in game, from Snail Game's point of view.
New Age Of Armor Guide:
________________________________________________
________________________________________________
Player Attribute Points:
For new chars:
1) Open up the Cash Shop.
2) Go to the Upgrading and Initializing Stat Points tab.
3) Buy a Pilot's Attribute Fast Generating Tool II
For chars with over 180 total attribute points:
1) Open up the Cash Shop.
2) Go to the Upgrading and Initializing Stat Points tab.
3) Buy an Attribute Resetting Item.
4) Put your 4 basic attributes to 45 each, the remaining points go wherever you want.
Player Knowledge/Acquirement Points:
1) Put whatever your armor asks you for.
2) If you have left over points and are above lvl 60, drop 30 points into your Weapon research, another 30 points into Armor Research, and as many points in Electronic Research as needed. Save the remaining points.
________________________________________________
________________________________________________
Choosing armor parts, ranking them up, etc.
This is your shopping list:
Reconfigurable parts:
- Rank 2+4 or rank 1+2 (rare) armor resistance Head. The first one drops in Anilas and West Logu, the other one in Domier and Osider.
- Rank 1+2 armor resistance Body. Drops in Domier and Osider.
- Rank 3+4 or rank 1+2 (rare) armor resistance Arms. The first one drops in Cargemiller and West Soer, the second one in Domier and Osider.
- Rank 4+6 or rank 1+2 (rare) armor resistance Legs. The first one drops in Cargemiller and West Soer, the second one in Domier and Osider.
- Rank 7+4 (sorta rare) or rank 8+4 or 7+2 or 8+2 armor resistance Engine. All dropped by Alcaleph in EP.
Non-reconfigurable parts:
- Rank 17 +50% body durability +10 all resistances Control Cabin. Dropped by King Kong, fb40.
- Rank 17 +75% leg durability +15 all resistances Core. Dropped by the last boss in FB35, and some say a boss in fb45 drops it too.
- There are some purple r19 version of the 2 above, with +hp% instead of dur, so they work better. Im not sure where do they drop, maybe from the event Gift Boxes dropped by the new Gulo Pirates & Turkeys (located in Anilas and West Logu), and the new Tri Headed Machinery Beast and Templars (located in Lasia and Arcadia). These boxes give purple r19 set parts, endgame weapons, r4++ enhancer chips, and AOAVIP Loyalty cards, among other things.
- +11 (neo) or +13 (nat) or +15 (enh) dual lock Jetpack, or wait till the resistance ones come out, all dropped in fb40 or 45 anyways.
________________________________________________
________________________________________________
Combining the reconfigurable parts:
1) B> from someone all rank 19 set parts for your race, with any stats at all (Enh -> Moloch, Neo -> Night, Nat -> Executioner). You can also obtain them from a quest in Ganars/Andrew, located in the Armor Battle server (red planet, lvl 21+ required). You could go and farm the parts off FB40 & FB45, but its slow so don't bother with it.
2) Open the Cash Shop.
3) Go to the Compound Slot tab, and into the Compounding Chip subsection.
4) For each of the parts listed in the Reconfigurable Parts section in this guide, buy a Composing Chip that equals its rank. Since all parts are under rank 10, the Composing chip 1 will work for them all, so you need 5 of these.
5) Walk over to the npc called "High Composing Service Provider" (golden name)
6) Repeat the following steps for each of your 5 reconfigurable parts:
- a) Choose the Parts Composing option.
- b) Drop the r19 set part in the Main Devices slot, the low rank part in the Auxiliary Devices slot, and the Composing Chip 1 in the Mix The Chip slot. Of course, arms go with arms, legs with legs, etc.
- c) Pull the lever.
- d) Drag the part from the Finished Product back into your Inventory. Pic:

________________________________________________
________________________________________________
Ranking them up:
1) Walk over to the npc called "High Composing Service Provider" npc.
2) Repeat the following steps untill all parts read Armor Resistance +30:
- a) Select the Parts Transformation option.
- b) Drop your combined part, obtained from the previous section, into the slot in this menu. It should display the crystal you need to use in order to rank up the part.
- c) Go to the Cash Shop in the Official Website, I believe its this link.
- d) Click on the New tab, then click the Next button until you reach page 11 or 12. The Nemo Crystals are displayed there, so buy whatever the npc told you to buy.
- e) I have no idea where you retrieve the items ingame, maybe the Guide npc does it.
- f) When you get the chips, head back to the "High Composing Service Provider" npc, and back into the Parts Transformation option.
- g) I think it consumes the Nemo Crystals on your inv automatically. So click the Reconfiguration button.
Again, repeat those steps for every part, until they all display Armor Resistance +30. If your part requires crystals not sold in the Cash Shop, which is possible, read the following section. Pic:

________________________________________________
________________________________________________
Combining the Nemo/Nym Crystals:
I think higher ranked armor parts will require crystals that are not sold in the Cash Shop, so you need to buy 5 of them and combine them in order to get a higher version one. Or something like that. Anyways:
1) Back to the "High Composing Service Provider" npc.
2) Click the Material Composing option.
3) I think you are supposed to drop 5 crystals (one per slot), click the number 5, then click Compound. Im not really sure, since the ingame description is in broken English, and some of the text is in Non Standard ASCII. Anyways, after you have the higher rank crystal, you can proceed with the ranking up process. Pic:

________________________________________________
________________________________________________
Adding 2 additional stats to your combined part:
1) Open up the Cash Shop
2) Go to the Compound Slot tab, and into the Transplant Chip subsection.
3) Buy 5 Transplant Chips (one for each of your reconfigurable parts)
4) Back to the "High Composing Service Provider" npc.
5) Click the Parts Transplant option.
6) Put a purple r19 set part (you can get them off the boxes dropped by the new Gulo Pirates, Turkeys, Tri Headed Machinery Beasts and Templars, most parts come with +hp% and + partial armor resistance) in the Main Devices slot, your ranked & combined rank 19 part in the Auxiliary Devices slot, and a Transplant Chip into the Transplant the Chip slot.
7) Pull the lever, and drag and drop the part from the Finished Product slot back into your inventory. Pic:

The last option given by the same NPC, is a secondary ranking system for improving the ranked weapons and r19 sets of armor. You have to drop the reconfigured weapon/combined armor part in the slot in the middle, and 4 Advance Upgrading Crystals in the empty slots around it (these crystals drop in fb45), then click the number 4 button on top, and the "Upgrading" button at the bottom of the screen. You can upgrade the secondary rank up to rank 15, but if the process fails, your part/weapon will lose ranks instead of increasing them. The higher the rank, the more the ranks it will lose too.
You will want to spam that feature anyways, since it improves your weapon's and armor parts' stats. Pic:

________________________________________________
________________________________________________
Making your Non-reconfigurable parts become decent.
Cabin & Core:
1) Go to the Space War server (dark blue planet, lvl 35+ required)
2) Travel to the Ark or Larsiver Space stations.
3) IF your core/cabin do not currently have any slot, follow these substeps:
- a) Open the Cash Shop.
- b) Go to the Compound Slot tab, and into the Removing and Transforming subsection.
- c) Buy a "The Connector for Slot" for each core/cabin that does not currently have any slots.
- d) Walk over to the "Socketing Service Provider" npc.
- e) Select the Embed Device option.
- f) Drag and drop your non-slotted core/cabin into the lone slot to the left, while having a "The Connector for Slot" in your inventory.
- g) Click the "Create a Slot" button.
- h) Your core/cabin is now slotted, so drag it back into your inv.
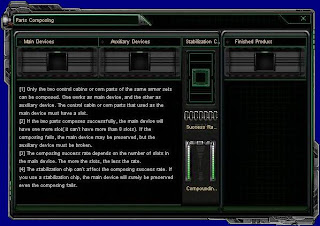
4) Your core/cabin has slots, so walk over to the "Composing Service Provider" NPC.
5) Choose the Parts Composing option.
6) Drag your slotted core/cabin which you want to upgrade, into the Main Devices slot. Drag a gray core/cabin of identical name (you can buy them at the Parts Dealer NPC found in the same map) into the Auxiliary Devices slot, and a Stabilization Chip into the Stabilization Chip slot.
Stabilization Chips are found in the Cash Shop, under the Compound Slot tab, Stabling Upgrading subsection.
7) Pull the lever, whether the process worked or not, take out your cabin/core from the Finished Product slot.
8) Repeat the previous steps until your core has 10 slots. Your cabin will need 3 to 6 slots, depending on your race (check following section). Pic:
________________________________________________
________________________________________________
Buying chips to put into your Cabin & Core slots:
1) Open up the Cash Shop, go to the Defense Chip tab.
2) Armor Enhancers & Hardeners. Buy:
- Armor Enhancer 6
- Armor Head Enhanced Device VI
- Armor Arm Enhanced Device VI
- Armor Leg Enhanced Device VI
- Armor Kinetic Hardener 6
- Armor Thermic Hardener 6
- Armor Electromagnetic Hardener 6
- Armor Explosive Hardener 6
These rank 6 chips will work well, but of course, the rank 7 versions are recommended. If you directly buy the rank 7 chips, then you can skip part of the "Combining chips" section of this guide (its the next section).
3) : Weapon Enhancers and Skill Chips:
Natural Human:
- a) Go to the Attacking Chip tab, Human Subsection.
Buy a Laser Enhancer 7 and/or Canister Enhancer 7. Enhancers type 6 are fine, but you will be mediocre.
- b) Go to the Skill Chip tab, Human subsection.
Buy:
- Rainbow 6 Enhanced Repairer
- Fire 6 Fire Optimizer (if you use lasers)
- Haze 6 Fire Optimizer (if you use lasers)
- Brash 6 Fire Optimizer (if you use lasers and dont mind waiting months till this chip becomes actually useful)
- Hurricane 6 Fire Optimizer (same as Brash, it will take months until this chip is actually useful)
- Thunderbolt 6 Fire Optimizer (if you use canisters)
Enhanced Human:
- a) Go to the Attacking Chip tab, Enhanced Human Subsection.
Buy a Cartridge Enhancer 7. You can buy a Combat Enhancer 6 or 7 if you want to spam the Tine skill more effectively. Cartridge Enhancer 6 is fine, but you will be mediocre.
- b) Go to the Skill Chip tab, Enhanced Human Subsection.
Buy:
- Eye of Hawk 6 Fire Optimizer
- Tongue of Wolf VI Fire Optimizer (same as Hurricane, it will take months until this chip is actually useful)
- Tine 4 Fire optimizer (for combat weapons)
- Kiss of Spider 6 Fire Optimizer (greatly increases damage, in exchange for armor resistance)
Neo Human:
- a) Go to the Attacking Chip tab, Neo Human Subsection.
Buy a Electromagnetism Enhancer 7 or a Particle Enhancer 7. Enhancers type 6 are fine, but you will be mediocre.
- b) Go to the Skill Chip tab, Neo Human Subsection.
Buy:
- Lithosphere VI Special Defencer
- Sunglow VI Fire Optimizer (if you use electromagnetic weapons)
- Planet VI Fire Optimizer (if you use electromagnetic weapons, better than Sunglow by endgame)
- Solar Flare VI Fire Optimizer (if you use electromagnetic weapons, but same as Tongue of Wolf, it will take months untill this chip is actually useful)
- Meteor VI Fire Optimizer (if you use particle weapons, same as Solar Flare, it will take months untill this chip is actually useful)
- Nebula VI Fire Optimizer (if you use particle weapons)
Optional:
- Missile Enhancer 7 (located in the Currency subsection of the Attacking Chip tab)
________________________________________________
________________________________________________
Combining chips:
This is an optional yet very recommended step. Your objective is to create rank 7 armor enhancers and skill chips, and rank 8 weapon enhancers. In order to create such chips, you will need to combine 5 identical chips of the previous rank, eg, 5 rank 6s to make a 7, 5 rank 7s to make an 8, and so on. So buy 5 identical chips of the ones listed before (if you already bought rank 7 armor enhancers and hardeners, then you dont need to buy more of those), and:
1) Open the Cash Shop.
2) Go to the Compound Slot tab, Stabling Upgrading subsection.
3) For every group of 5 identical chips you bought, buy an Optimizing Chip Type II.
4) Walk over to the Composing Service Provider npc.
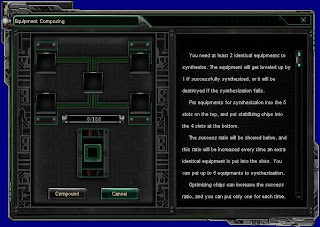
5) Choose the Equiment Composing Option.
6) Fill the 5 slots in the upper section, with 5 identical skill/enhancer chips (one chip per slot), and put an Optimizing Chip Type II in the lone slot at the bottom.
7) Click the Compound button, then drag the new and improved chip back into your inventory.
This process combines 5 chips, to create a new chip of a higher rank. So repeat it untill you have all your skill chips and armor chips at rank 7, and all your weapon type enhancers at rank 8. Pic:
________________________________________________
________________________________________________
Filling your Cabin & Core with those chips:
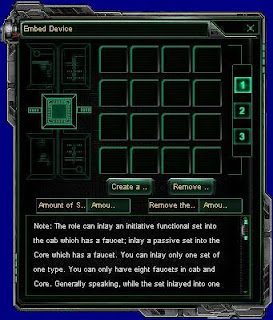
1) Walk over to the "Socketing Service Provider" Npc.
2) Select the Embed Device option.
3) Drag your cabin/core into the lone slot to the left.
4) Drag the chips into the other free slots:
- a) If you put the core, then drag all the chips in the general shopping list, and the weapon enhancer type chips from the race specific shopping list, into the free slots that appear to the right of the interface.
- b) If you put the cabin, then drag all the chips from the race specific shopping list, except for the weapon enhancers, since they go inside the core
5) After you are done, drag the cabin/core back into your inv. Pic:
________________________________________________
________________________________________________
Jetpack:
1) Open the Cash Shop.
2) Go to the Aircraft tab.
3)
- a) If you are Natural Human, go to the Human tab, and buy a MNM-wing of Seraph Armor Type II Eternal.
- b) If you are Enhanced Human, go to the Enhanced Human tab, and buy a GVC-wing of Satan Armor Type II Eternal.
- c) If you are Neo Human, go to the Neo Human tab, and buy an AEX-wing of Chaos Armor Type II Eternal.
4) Walk over to the "Composing Service Provider" npc.
5) Choose the Aircraft Alteration Option.
6) Put the Cash Shop wings in the Main Devices slot, and the Jetpack described previously in the Auxiliary Devices slot.
7) Pull the lever, drag the wings from the Finished Product slot back into your inv. I dont have a Pic, but the interface is very similar to the weapon combining/parts composing ones.
________________________________________________
________________________________________________
Getting a gun and ranking it up:
Melee weapons are a waste of time atm, so get a gun if you are enh.
Getting the gun:
1) Farm for weapons in FB45, or the weapon instances. Its slow, so don't bother with it.
2) Buy weapons from someone else.
3) Event mobs:
- a) Mass farm the Gulo Pirates/Turkeys/Tri Headed Machinery Beasts/Templars that drop regular and vip boxes
- b) Mass buy regular and vip keys (regular keys are sold in ingame Supply Shops, Vip Keys are sold in the Website Cash Shop, under the Function Tab)
- c) Mass open boxes (first click the key, then the box). They give random endgame unbound weapons sometimes, so you can trade them with someone else if you didnt find what you are looking for. You may even find purple rank 19 set parts.
Repeat the previous steps until you have the equivalent of 32 rank 0 guns (rank 1 guns are worth 2 rank 0 guns, so you can get 16 rank 1 guns and it still works). The guns you will probably get will say something like Advanced 5 and Medium 3 knowledge requirements, or Advanced 4 and Medium 3 knowledge requirements. They tend to have the same dps overall, but most players use the Adv 5 Med 3 type. Of course, if you can get 32 of both, even better!
________________________________________________
________________________________________________
Combining the guns:
1) Open the Cash Shop.
2) Go to the Compound Slot tab, and into the Stabling Upgrading subsection (selected by default).
3) Depending on how many guns you got in the last step, you will need to buy anywhere in between 15 to 31 "Weapon Composing Optimization III" chips. Each rank 1 gun you have, means 1 less chip you need, starting at 31 chips (you need 31 chips if you have 32 rank 0 guns, but 15 chips if you have 16 rank 1 guns).
5) Go to the Armor Battle server (red planet, lvl 21+ required).
6) Go to any City except for Andrew and Ganars.
7) Walk over to the "Composing Service Provider" npc.
8) Click the Weapon Combining option.
9) Put 2 identical weapons (same type and rank), one in the first slot, one in the 2nd slot, and a Weapon Composing Optimization III in the 3rd slot.
10) Pull the lever, take out your weapon from the 4th slot.
11) Repeat the previous steps until you have achieved a rank 5 weapon, here is a chart that may be of help:

Click on the pic to open a bigger image. As you can see, 2 rank 0s make a 1, 2 1s make a 2, 2 2s make a 3, and so on.
Note: A rank 5 weapon is average/mediocre, so you will want to aim for rank 6 or 7 at least. Thus, repeat the previous process untill you reach that rank. Pic:

________________________________________________
________________________________________________
Transforming Modules:
1) Open the Cash Shop.
2) Go to the Compound Slot tab, Stabling Upgrading subsection.
3) Depending on your race, buy a Circle of Glaive [Classic version] (for Natural Humans), or Shadow of Onimusha [Classic version] (for Enhanced Humans), or Wing of Freedom [Classic version] (for Neo Humans).
4) Right click the box, you 'll get your TF mod and a bunch of energy cubes.
5) Equip the mod, right click the cubes till the green bar becomes full, and you are ready to go.
________________________________________________
________________________________________________
Training your char and your mod.
There are 2 ways of doing this.
If you are under lvl 58:
1) Open the Cash Shop.
2) Go to the Upgrading and Initializing Stat Points tab, Double Experience subsection.
3) Buy a bunch of Doube Exp Type III and Transforming Double Exp Type II.
4) Ask a fellow CS user to help you train till lvl 58, since Snail Game drastically nerfed every single training spot, in order to promote the use of a new Cash Shop item that only affects players above lvl 58.
If it is of any help, there are a bunch of quests in Ganars/Andrew only available for people with AoAVIP Loyalty cards, of which you should have a lot if you are reading this. I guess they give good exp.
If you are lvl 58 or higher:
1) Quoted from the forum in the last patch:
"Drop of advanced and medium level-up treasure boxes: All the Hiring guard of the Commonwealth and strike monster(excluding FB ) above level 50 and all the monsters at Mare Tranquillitatis." (sic)
That means that the monster listed above, drop those boxes.
2) Get your hand on a bunch of those, they are usually being sold at bourse (advanced boxes are recommended)
3) Open the Cash Shop.
4) Go to the Compound Slot tab, Stabling Upgrading subsection.
5) Buy a Key for Advanced Level Up Treasure Box/Key for Medium Level Up Treasure Box for every advanced/medium box you have, respectively.
6) Click the key, then click the box, and you will recieve free exp every 6 seconds for a period of 3 hours. Dont logout.
I believe the medium type boxes give 8.244.000 exp in total, while the advanced ones give 83.309.400 exp in total.
________________________________________________
________________________________________________
PvPing:
If you have followed all the steps before, then you only need a few more things in order to ensure victory:
1) Open the Cash Shop.
2) Go to the Consumables tab, Ammunition subsection.
3) Buy a few stacks of Ammo 5 for whatever gun you are carrying. Get at least 4 or 5 Full stacks.
4) While in the Consumables tab, go to the Amending Tools subsection.
5) Buy many stacks of "Ney Type of Repair Package type 3".
6) Go to the Communication and Store tab in the Cash Shop, and into the Information Transmit subsection.
7) Buy a bunch of Communication Equipment and Return to City in a Battle.
How to use the above mentioned items:
1) Ammo: self explanatory.
2) Repair packages: spam them everytime you lose more than 6k armor durability.
3) Return to City in a Battle: use them when things get difficult in PvP, and you dont feel like dying.
4) Communication Equipment: use them to spam the Universal Chat Channel, preferably during battles, and preferably with nonsensical comments.
.[/sarcasm]
________________________________________________
________________________________________________
This is probably the last update the guide will see.
This Guide is not a joke, but a sad, sad fact. It explains, more or less, everything you are expected to do in game, from Snail Game's point of view.
New Age Of Armor Guide:
________________________________________________
________________________________________________
Player Attribute Points:
For new chars:
1) Open up the Cash Shop.
2) Go to the Upgrading and Initializing Stat Points tab.
3) Buy a Pilot's Attribute Fast Generating Tool II
For chars with over 180 total attribute points:
1) Open up the Cash Shop.
2) Go to the Upgrading and Initializing Stat Points tab.
3) Buy an Attribute Resetting Item.
4) Put your 4 basic attributes to 45 each, the remaining points go wherever you want.
Player Knowledge/Acquirement Points:
1) Put whatever your armor asks you for.
2) If you have left over points and are above lvl 60, drop 30 points into your Weapon research, another 30 points into Armor Research, and as many points in Electronic Research as needed. Save the remaining points.
________________________________________________
________________________________________________
Choosing armor parts, ranking them up, etc.
This is your shopping list:
Reconfigurable parts:
- Rank 2+4 or rank 1+2 (rare) armor resistance Head. The first one drops in Anilas and West Logu, the other one in Domier and Osider.
- Rank 1+2 armor resistance Body. Drops in Domier and Osider.
- Rank 3+4 or rank 1+2 (rare) armor resistance Arms. The first one drops in Cargemiller and West Soer, the second one in Domier and Osider.
- Rank 4+6 or rank 1+2 (rare) armor resistance Legs. The first one drops in Cargemiller and West Soer, the second one in Domier and Osider.
- Rank 7+4 (sorta rare) or rank 8+4 or 7+2 or 8+2 armor resistance Engine. All dropped by Alcaleph in EP.
Non-reconfigurable parts:
- Rank 17 +50% body durability +10 all resistances Control Cabin. Dropped by King Kong, fb40.
- Rank 17 +75% leg durability +15 all resistances Core. Dropped by the last boss in FB35, and some say a boss in fb45 drops it too.
- There are some purple r19 version of the 2 above, with +hp% instead of dur, so they work better. Im not sure where do they drop, maybe from the event Gift Boxes dropped by the new Gulo Pirates & Turkeys (located in Anilas and West Logu), and the new Tri Headed Machinery Beast and Templars (located in Lasia and Arcadia). These boxes give purple r19 set parts, endgame weapons, r4++ enhancer chips, and AOAVIP Loyalty cards, among other things.
- +11 (neo) or +13 (nat) or +15 (enh) dual lock Jetpack, or wait till the resistance ones come out, all dropped in fb40 or 45 anyways.
________________________________________________
________________________________________________
Combining the reconfigurable parts:
1) B> from someone all rank 19 set parts for your race, with any stats at all (Enh -> Moloch, Neo -> Night, Nat -> Executioner). You can also obtain them from a quest in Ganars/Andrew, located in the Armor Battle server (red planet, lvl 21+ required). You could go and farm the parts off FB40 & FB45, but its slow so don't bother with it.
2) Open the Cash Shop.
3) Go to the Compound Slot tab, and into the Compounding Chip subsection.
4) For each of the parts listed in the Reconfigurable Parts section in this guide, buy a Composing Chip that equals its rank. Since all parts are under rank 10, the Composing chip 1 will work for them all, so you need 5 of these.
5) Walk over to the npc called "High Composing Service Provider" (golden name)
6) Repeat the following steps for each of your 5 reconfigurable parts:
- a) Choose the Parts Composing option.
- b) Drop the r19 set part in the Main Devices slot, the low rank part in the Auxiliary Devices slot, and the Composing Chip 1 in the Mix The Chip slot. Of course, arms go with arms, legs with legs, etc.
- c) Pull the lever.
- d) Drag the part from the Finished Product back into your Inventory. Pic:

________________________________________________
________________________________________________
Ranking them up:
1) Walk over to the npc called "High Composing Service Provider" npc.
2) Repeat the following steps untill all parts read Armor Resistance +30:
- a) Select the Parts Transformation option.
- b) Drop your combined part, obtained from the previous section, into the slot in this menu. It should display the crystal you need to use in order to rank up the part.
- c) Go to the Cash Shop in the Official Website, I believe its this link.
- d) Click on the New tab, then click the Next button until you reach page 11 or 12. The Nemo Crystals are displayed there, so buy whatever the npc told you to buy.
- e) I have no idea where you retrieve the items ingame, maybe the Guide npc does it.
- f) When you get the chips, head back to the "High Composing Service Provider" npc, and back into the Parts Transformation option.
- g) I think it consumes the Nemo Crystals on your inv automatically. So click the Reconfiguration button.
Again, repeat those steps for every part, until they all display Armor Resistance +30. If your part requires crystals not sold in the Cash Shop, which is possible, read the following section. Pic:

________________________________________________
________________________________________________
Combining the Nemo/Nym Crystals:
I think higher ranked armor parts will require crystals that are not sold in the Cash Shop, so you need to buy 5 of them and combine them in order to get a higher version one. Or something like that. Anyways:
1) Back to the "High Composing Service Provider" npc.
2) Click the Material Composing option.
3) I think you are supposed to drop 5 crystals (one per slot), click the number 5, then click Compound. Im not really sure, since the ingame description is in broken English, and some of the text is in Non Standard ASCII. Anyways, after you have the higher rank crystal, you can proceed with the ranking up process. Pic:

________________________________________________
________________________________________________
Adding 2 additional stats to your combined part:
1) Open up the Cash Shop
2) Go to the Compound Slot tab, and into the Transplant Chip subsection.
3) Buy 5 Transplant Chips (one for each of your reconfigurable parts)
4) Back to the "High Composing Service Provider" npc.
5) Click the Parts Transplant option.
6) Put a purple r19 set part (you can get them off the boxes dropped by the new Gulo Pirates, Turkeys, Tri Headed Machinery Beasts and Templars, most parts come with +hp% and + partial armor resistance) in the Main Devices slot, your ranked & combined rank 19 part in the Auxiliary Devices slot, and a Transplant Chip into the Transplant the Chip slot.
7) Pull the lever, and drag and drop the part from the Finished Product slot back into your inventory. Pic:

The last option given by the same NPC, is a secondary ranking system for improving the ranked weapons and r19 sets of armor. You have to drop the reconfigured weapon/combined armor part in the slot in the middle, and 4 Advance Upgrading Crystals in the empty slots around it (these crystals drop in fb45), then click the number 4 button on top, and the "Upgrading" button at the bottom of the screen. You can upgrade the secondary rank up to rank 15, but if the process fails, your part/weapon will lose ranks instead of increasing them. The higher the rank, the more the ranks it will lose too.
You will want to spam that feature anyways, since it improves your weapon's and armor parts' stats. Pic:

________________________________________________
________________________________________________
Making your Non-reconfigurable parts become decent.
Cabin & Core:
1) Go to the Space War server (dark blue planet, lvl 35+ required)
2) Travel to the Ark or Larsiver Space stations.
3) IF your core/cabin do not currently have any slot, follow these substeps:
- a) Open the Cash Shop.
- b) Go to the Compound Slot tab, and into the Removing and Transforming subsection.
- c) Buy a "The Connector for Slot" for each core/cabin that does not currently have any slots.
- d) Walk over to the "Socketing Service Provider" npc.
- e) Select the Embed Device option.
- f) Drag and drop your non-slotted core/cabin into the lone slot to the left, while having a "The Connector for Slot" in your inventory.
- g) Click the "Create a Slot" button.
- h) Your core/cabin is now slotted, so drag it back into your inv.
4) Your core/cabin has slots, so walk over to the "Composing Service Provider" NPC.
5) Choose the Parts Composing option.
6) Drag your slotted core/cabin which you want to upgrade, into the Main Devices slot. Drag a gray core/cabin of identical name (you can buy them at the Parts Dealer NPC found in the same map) into the Auxiliary Devices slot, and a Stabilization Chip into the Stabilization Chip slot.
Stabilization Chips are found in the Cash Shop, under the Compound Slot tab, Stabling Upgrading subsection.
7) Pull the lever, whether the process worked or not, take out your cabin/core from the Finished Product slot.
8) Repeat the previous steps until your core has 10 slots. Your cabin will need 3 to 6 slots, depending on your race (check following section). Pic:

________________________________________________
________________________________________________
Buying chips to put into your Cabin & Core slots:
1) Open up the Cash Shop, go to the Defense Chip tab.
2) Armor Enhancers & Hardeners. Buy:
- Armor Enhancer 6
- Armor Head Enhanced Device VI
- Armor Arm Enhanced Device VI
- Armor Leg Enhanced Device VI
- Armor Kinetic Hardener 6
- Armor Thermic Hardener 6
- Armor Electromagnetic Hardener 6
- Armor Explosive Hardener 6
These rank 6 chips will work well, but of course, the rank 7 versions are recommended. If you directly buy the rank 7 chips, then you can skip part of the "Combining chips" section of this guide (its the next section).
3) : Weapon Enhancers and Skill Chips:
Natural Human:
- a) Go to the Attacking Chip tab, Human Subsection.
Buy a Laser Enhancer 7 and/or Canister Enhancer 7. Enhancers type 6 are fine, but you will be mediocre.
- b) Go to the Skill Chip tab, Human subsection.
Buy:
- Rainbow 6 Enhanced Repairer
- Fire 6 Fire Optimizer (if you use lasers)
- Haze 6 Fire Optimizer (if you use lasers)
- Brash 6 Fire Optimizer (if you use lasers and dont mind waiting months till this chip becomes actually useful)
- Hurricane 6 Fire Optimizer (same as Brash, it will take months until this chip is actually useful)
- Thunderbolt 6 Fire Optimizer (if you use canisters)
Enhanced Human:
- a) Go to the Attacking Chip tab, Enhanced Human Subsection.
Buy a Cartridge Enhancer 7. You can buy a Combat Enhancer 6 or 7 if you want to spam the Tine skill more effectively. Cartridge Enhancer 6 is fine, but you will be mediocre.
- b) Go to the Skill Chip tab, Enhanced Human Subsection.
Buy:
- Eye of Hawk 6 Fire Optimizer
- Tongue of Wolf VI Fire Optimizer (same as Hurricane, it will take months until this chip is actually useful)
- Tine 4 Fire optimizer (for combat weapons)
- Kiss of Spider 6 Fire Optimizer (greatly increases damage, in exchange for armor resistance)
Neo Human:
- a) Go to the Attacking Chip tab, Neo Human Subsection.
Buy a Electromagnetism Enhancer 7 or a Particle Enhancer 7. Enhancers type 6 are fine, but you will be mediocre.
- b) Go to the Skill Chip tab, Neo Human Subsection.
Buy:
- Lithosphere VI Special Defencer
- Sunglow VI Fire Optimizer (if you use electromagnetic weapons)
- Planet VI Fire Optimizer (if you use electromagnetic weapons, better than Sunglow by endgame)
- Solar Flare VI Fire Optimizer (if you use electromagnetic weapons, but same as Tongue of Wolf, it will take months untill this chip is actually useful)
- Meteor VI Fire Optimizer (if you use particle weapons, same as Solar Flare, it will take months untill this chip is actually useful)
- Nebula VI Fire Optimizer (if you use particle weapons)
Optional:
- Missile Enhancer 7 (located in the Currency subsection of the Attacking Chip tab)
________________________________________________
________________________________________________
Combining chips:
This is an optional yet very recommended step. Your objective is to create rank 7 armor enhancers and skill chips, and rank 8 weapon enhancers. In order to create such chips, you will need to combine 5 identical chips of the previous rank, eg, 5 rank 6s to make a 7, 5 rank 7s to make an 8, and so on. So buy 5 identical chips of the ones listed before (if you already bought rank 7 armor enhancers and hardeners, then you dont need to buy more of those), and:
1) Open the Cash Shop.
2) Go to the Compound Slot tab, Stabling Upgrading subsection.
3) For every group of 5 identical chips you bought, buy an Optimizing Chip Type II.
4) Walk over to the Composing Service Provider npc.
5) Choose the Equiment Composing Option.
6) Fill the 5 slots in the upper section, with 5 identical skill/enhancer chips (one chip per slot), and put an Optimizing Chip Type II in the lone slot at the bottom.
7) Click the Compound button, then drag the new and improved chip back into your inventory.
This process combines 5 chips, to create a new chip of a higher rank. So repeat it untill you have all your skill chips and armor chips at rank 7, and all your weapon type enhancers at rank 8. Pic:

________________________________________________
________________________________________________
Filling your Cabin & Core with those chips:
1) Walk over to the "Socketing Service Provider" Npc.
2) Select the Embed Device option.
3) Drag your cabin/core into the lone slot to the left.
4) Drag the chips into the other free slots:
- a) If you put the core, then drag all the chips in the general shopping list, and the weapon enhancer type chips from the race specific shopping list, into the free slots that appear to the right of the interface.
- b) If you put the cabin, then drag all the chips from the race specific shopping list, except for the weapon enhancers, since they go inside the core
5) After you are done, drag the cabin/core back into your inv. Pic:

________________________________________________
________________________________________________
Jetpack:
1) Open the Cash Shop.
2) Go to the Aircraft tab.
3)
- a) If you are Natural Human, go to the Human tab, and buy a MNM-wing of Seraph Armor Type II Eternal.
- b) If you are Enhanced Human, go to the Enhanced Human tab, and buy a GVC-wing of Satan Armor Type II Eternal.
- c) If you are Neo Human, go to the Neo Human tab, and buy an AEX-wing of Chaos Armor Type II Eternal.
4) Walk over to the "Composing Service Provider" npc.
5) Choose the Aircraft Alteration Option.
6) Put the Cash Shop wings in the Main Devices slot, and the Jetpack described previously in the Auxiliary Devices slot.
7) Pull the lever, drag the wings from the Finished Product slot back into your inv. I dont have a Pic, but the interface is very similar to the weapon combining/parts composing ones.
________________________________________________
________________________________________________
Getting a gun and ranking it up:
Melee weapons are a waste of time atm, so get a gun if you are enh.
Getting the gun:
1) Farm for weapons in FB45, or the weapon instances. Its slow, so don't bother with it.
2) Buy weapons from someone else.
3) Event mobs:
- a) Mass farm the Gulo Pirates/Turkeys/Tri Headed Machinery Beasts/Templars that drop regular and vip boxes
- b) Mass buy regular and vip keys (regular keys are sold in ingame Supply Shops, Vip Keys are sold in the Website Cash Shop, under the Function Tab)
- c) Mass open boxes (first click the key, then the box). They give random endgame unbound weapons sometimes, so you can trade them with someone else if you didnt find what you are looking for. You may even find purple rank 19 set parts.
Repeat the previous steps until you have the equivalent of 32 rank 0 guns (rank 1 guns are worth 2 rank 0 guns, so you can get 16 rank 1 guns and it still works). The guns you will probably get will say something like Advanced 5 and Medium 3 knowledge requirements, or Advanced 4 and Medium 3 knowledge requirements. They tend to have the same dps overall, but most players use the Adv 5 Med 3 type. Of course, if you can get 32 of both, even better!
________________________________________________
________________________________________________
Combining the guns:
1) Open the Cash Shop.
2) Go to the Compound Slot tab, and into the Stabling Upgrading subsection (selected by default).
3) Depending on how many guns you got in the last step, you will need to buy anywhere in between 15 to 31 "Weapon Composing Optimization III" chips. Each rank 1 gun you have, means 1 less chip you need, starting at 31 chips (you need 31 chips if you have 32 rank 0 guns, but 15 chips if you have 16 rank 1 guns).
5) Go to the Armor Battle server (red planet, lvl 21+ required).
6) Go to any City except for Andrew and Ganars.
7) Walk over to the "Composing Service Provider" npc.
8) Click the Weapon Combining option.
9) Put 2 identical weapons (same type and rank), one in the first slot, one in the 2nd slot, and a Weapon Composing Optimization III in the 3rd slot.
10) Pull the lever, take out your weapon from the 4th slot.
11) Repeat the previous steps until you have achieved a rank 5 weapon, here is a chart that may be of help:

Click on the pic to open a bigger image. As you can see, 2 rank 0s make a 1, 2 1s make a 2, 2 2s make a 3, and so on.
Note: A rank 5 weapon is average/mediocre, so you will want to aim for rank 6 or 7 at least. Thus, repeat the previous process untill you reach that rank. Pic:

________________________________________________
________________________________________________
Transforming Modules:
1) Open the Cash Shop.
2) Go to the Compound Slot tab, Stabling Upgrading subsection.
3) Depending on your race, buy a Circle of Glaive [Classic version] (for Natural Humans), or Shadow of Onimusha [Classic version] (for Enhanced Humans), or Wing of Freedom [Classic version] (for Neo Humans).
4) Right click the box, you 'll get your TF mod and a bunch of energy cubes.
5) Equip the mod, right click the cubes till the green bar becomes full, and you are ready to go.
________________________________________________
________________________________________________
Training your char and your mod.
There are 2 ways of doing this.
If you are under lvl 58:
1) Open the Cash Shop.
2) Go to the Upgrading and Initializing Stat Points tab, Double Experience subsection.
3) Buy a bunch of Doube Exp Type III and Transforming Double Exp Type II.
4) Ask a fellow CS user to help you train till lvl 58, since Snail Game drastically nerfed every single training spot, in order to promote the use of a new Cash Shop item that only affects players above lvl 58.
If it is of any help, there are a bunch of quests in Ganars/Andrew only available for people with AoAVIP Loyalty cards, of which you should have a lot if you are reading this. I guess they give good exp.
If you are lvl 58 or higher:
1) Quoted from the forum in the last patch:
"Drop of advanced and medium level-up treasure boxes: All the Hiring guard of the Commonwealth and strike monster(excluding FB ) above level 50 and all the monsters at Mare Tranquillitatis." (sic)
That means that the monster listed above, drop those boxes.
2) Get your hand on a bunch of those, they are usually being sold at bourse (advanced boxes are recommended)
3) Open the Cash Shop.
4) Go to the Compound Slot tab, Stabling Upgrading subsection.
5) Buy a Key for Advanced Level Up Treasure Box/Key for Medium Level Up Treasure Box for every advanced/medium box you have, respectively.
6) Click the key, then click the box, and you will recieve free exp every 6 seconds for a period of 3 hours. Dont logout.
I believe the medium type boxes give 8.244.000 exp in total, while the advanced ones give 83.309.400 exp in total.
________________________________________________
________________________________________________
PvPing:
If you have followed all the steps before, then you only need a few more things in order to ensure victory:
1) Open the Cash Shop.
2) Go to the Consumables tab, Ammunition subsection.
3) Buy a few stacks of Ammo 5 for whatever gun you are carrying. Get at least 4 or 5 Full stacks.
4) While in the Consumables tab, go to the Amending Tools subsection.
5) Buy many stacks of "Ney Type of Repair Package type 3".
6) Go to the Communication and Store tab in the Cash Shop, and into the Information Transmit subsection.
7) Buy a bunch of Communication Equipment and Return to City in a Battle.
How to use the above mentioned items:
1) Ammo: self explanatory.
2) Repair packages: spam them everytime you lose more than 6k armor durability.
3) Return to City in a Battle: use them when things get difficult in PvP, and you dont feel like dying.
4) Communication Equipment: use them to spam the Universal Chat Channel, preferably during battles, and preferably with nonsensical comments.
.[/sarcasm]
________________________________________________
________________________________________________
This is probably the last update the guide will see.
Minning
Mining is the fastest and easiest way of earning money in AoA (other than buying and selling cash shop items). Its quite simple. Every once in a while, a mine will pop up somewhere in a map. If you press F4, you ll get a mini map, with an icon indicating where the mine is. Once you are at the mine, left click on it, and that's it. Your mecha will start mining on its own.
While you are mining, you cant do much else, except for chatting, turning around, turning on/off your slide/jetpack. So you wont be able to attack, use skills, nor use repair packages. If you move after you have started mining, your mecha will stop mining, so you will need to start again.
As soon as you start mining, you ll notice a blue progress bar at the bottom of the screen. Once it disappears, you will be given a random number of crystals (usually between 0-3), and/or The remains from the transformation of component (frags). Then a new bar will appear, disappear, give you your reward, and so on. Sometimes it ll fail to prospect anything.
On average, mines have about 1.5k crystals, and Kryogen and higher lvl mines also have around 5k-7k frags. "Soloing" a mine may take around 80 minutes or so.
After you are done with the mine, you should have, if you soloed, about 1.5k crystals in your inv. You could just npc them, or trade them at specific npcs, who in some cases pay you a bit more than what a npc shop would, and also give you "random" items as bonus rewards. These random rewards are different for each type of crystals (most are green armor sets, repair packs, and in some cases weapons).
As far as I remember:
Origin Crystals are traded in Domier and Yeaslis.
Glint Crystals are traded in Luoky and Hane Harbour.
Honor Crystals are traded in Andrew and Ganars.
Confidence Crystals are traded in Sani and Niniway.
Kryogen Crystals are traded in Larmeya.
Fantasyland Crystals are traded in Mare Tranquilities.
Deepblue Crystals are traded in Ryan and Sala.
Milkway Crystals are traded in Ark Space Station and Larsiver.
Puzzle Crystals, are traded in Ark Space Station and Larsiver.
Some crystal quests have a level requirement though, so you may want to npc them if you cant turn them in yet. Some crystals can also be traded for exp at specific levels (Honor in Domier and Confidence in Larmeya, not sure though).
Note: The mines in Ice Planet are quite bad for mining, except for the ones in Gold Digging Area, which is a special map located past Element Digging Valley. This special map is full of mines which hold large amounts of crystals (Deep Blue range), TONS of frags, and no mobs at all. These mines spawn twice per day, and automatically disappear after around 2 hours. They are not unlimited though, if there are many players mining a single mine, it will disappear much faster. Generally after the 2 hours are gone, each char should have made at least ~ 2m in crystals, and ~60 stacks of frags.
All other mines in Ice Planet are crowded by mobs (except for a few in Palermo Iceberg Zone), and they don't drop frags, making mining there very unprofitable.
While you are mining, you cant do much else, except for chatting, turning around, turning on/off your slide/jetpack. So you wont be able to attack, use skills, nor use repair packages. If you move after you have started mining, your mecha will stop mining, so you will need to start again.
As soon as you start mining, you ll notice a blue progress bar at the bottom of the screen. Once it disappears, you will be given a random number of crystals (usually between 0-3), and/or The remains from the transformation of component (frags). Then a new bar will appear, disappear, give you your reward, and so on. Sometimes it ll fail to prospect anything.
On average, mines have about 1.5k crystals, and Kryogen and higher lvl mines also have around 5k-7k frags. "Soloing" a mine may take around 80 minutes or so.
After you are done with the mine, you should have, if you soloed, about 1.5k crystals in your inv. You could just npc them, or trade them at specific npcs, who in some cases pay you a bit more than what a npc shop would, and also give you "random" items as bonus rewards. These random rewards are different for each type of crystals (most are green armor sets, repair packs, and in some cases weapons).
As far as I remember:
Origin Crystals are traded in Domier and Yeaslis.
Glint Crystals are traded in Luoky and Hane Harbour.
Honor Crystals are traded in Andrew and Ganars.
Confidence Crystals are traded in Sani and Niniway.
Kryogen Crystals are traded in Larmeya.
Fantasyland Crystals are traded in Mare Tranquilities.
Deepblue Crystals are traded in Ryan and Sala.
Milkway Crystals are traded in Ark Space Station and Larsiver.
Puzzle Crystals, are traded in Ark Space Station and Larsiver.
Some crystal quests have a level requirement though, so you may want to npc them if you cant turn them in yet. Some crystals can also be traded for exp at specific levels (Honor in Domier and Confidence in Larmeya, not sure though).
Note: The mines in Ice Planet are quite bad for mining, except for the ones in Gold Digging Area, which is a special map located past Element Digging Valley. This special map is full of mines which hold large amounts of crystals (Deep Blue range), TONS of frags, and no mobs at all. These mines spawn twice per day, and automatically disappear after around 2 hours. They are not unlimited though, if there are many players mining a single mine, it will disappear much faster. Generally after the 2 hours are gone, each char should have made at least ~ 2m in crystals, and ~60 stacks of frags.
All other mines in Ice Planet are crowded by mobs (except for a few in Palermo Iceberg Zone), and they don't drop frags, making mining there very unprofitable.
Transforming Armor
As its name indicates, this feature allows all armors to transform into race specific machines. Enhanced Humans get animals, Natural Humans get cars, and Neo Humans get Jets. Additionally, all armors can also transform into another Robot mode. Apart from the graphic change, this feature also includes some passive buffs for your mecha.
It has a few drawbacks though. In order to maintain your transformation, whether it's the alternate robot form, or the animal/vehicle form, you need to use a special type of energy batteries (called "Transform Energy Block"), which are way more expensive than the normal batteries. Also, in order to get decent buffs out of your transforming module (this is the name of the part you need to add to your robot in order to enable the transformation feature), you need first to level/rank it up. The higher the mod's level/rank becomes, the higher its energy consumption becomes, and thus the more expensive it becomes to stay in transformed form. This is the energy consumption chart, credits go to Alucius:
rank 41-45 - 4 points
rank 46-50 - 7 points
rank 51-55 - 10 points
rank 56-60 - 15 points
Note: The transforming feature is not meant for low lvl players. The cost of the transform energy blocks used as batteries is huge, and most of the mods don't give bonuses good enough to compensate the money loss.
________________________________________________
________________________________________________
How to equip them:
Mods work like this. You equip the mod as like you do with any other piece - through the Armor Assembly npc. After that, you need to right click on any blue Transform Energy Block (bought from any supply shop, some bosses also drop them), and it ll automatically provide energy to the mod. The energy will be drained only during the time the mod is activated.
In order to transform into the robot mode, you need to click on the little squarish green button that shows below your health bars. As soon as you do so, your mecha will change into another robot, and the mod's buffs will activate, and remain active until you turn off the mod. After you are transformed into this alternate robot mode, you can then use the transform button in your F2 menu, to transform into the animal/car/jet mode. This mode retains the buffs from the tf mod, but will need its own set of weapons (and skills) in order to attack. These are the TF type weapons.
Tf weapons are usually stronger than the "normal" weapons, but their Power and Cl requirements are also much higher. To compensate for this however, the mod will always provide you an additional amount of Power and Cl.
Since you will be using a new set of weapons in this form, you will also have a new set of skills available for them. These chips are, like cabins and cores, inserted into the transforming mod through the Socketing Service Provider npc. Note that mods will automatically increase the amount of slots they have, when they lvl up. You cannot add slots to a mod through the Part Composing Provider npc.
Regarding drops:
- Low rank chips are dropped by low/med lvl bosses, most assault type bosses in Recruit Base do so quite frequently. Higher rank chips are dropped by the bosses in DV (credits to Cartman1001 for that info).
- The TF weapons are dropped by many medium lvl mobs, and high lvl bosses too. Like normal weapons, its recommended to use only Adv or Adv/Med type weapons.
- The TF mods are dropped by med and high lvl bosses, like the ones in Shadon, Mare Tranquilities, Anion Gravity Zone, Pandora's Lab, etc.
________________________________________________
________________________________________________
Bonuses:
Single stat mods:
Most mods will give, honestly speaking, crappy bonuses. The most common mods will only give you around +45% damage (applies to all weapons), sometimes along with a partial res (eg, armor kinetic res +5, or energy shield explosive res +5, etc). These are dropped, as far as I know, by Shadon, Anion Gravity Zone, and Gumu Disaster Area bosses. Here is a ss:

In this case, a 1 Snipe 01 chip was inserted into that mod, and it also gained some exp.
Double/Triple stat mods:
There are some better mods, that along with those hp and partial res bonuses, will also give you more stats, such as +ar/eshield dur, + flat hp, +ar/eshield dur (% based), etc. These are the best free mods available to players atm. Here is a ss of one of them:

As you can see, this mod greatly overpowers the previous one. These mods are dropped by the following bosses, credits for the info go to Alucius:
- Destroyer (mare): 100% chance of +5 rez(Blue), 50% +500 or more armor/es(Purple), 100% chance +45% or more enhance damage, 10% +direct damage (Purple)
- Scorpian Mech (FB35): 100% chance of +5 rez (Blue), 25% chance +4 shooting range (Blue), 50% +500 or more armor/es (Purple), 100% chance +45% or more enhance damage (Purple), 10% +direct damage (Purple)
- Darlon Elder (FB45):100% chance of +10 rez (Blue), 25% chance +4 shooting range (Blue), 25% chance +1 crit (Blue), 50% +700 armor/es at least (Purple), 100% chance +up to 50% enhance damage (Purple), 10% +direct damage (Purple)
Cash Shop Mods:
Finally, there are the Cash Shop mods, which have way more stats. These special mods are by far the best, here is a ss of one of them:

The exp on that mod doesnt show up, because it was linked in trade chat (I think this mod belongs to Sage, not sure). The other 2, I took the ss from my inventory/warehouse.
I believe the price of the CS mods is about 90 USD atm. Chips not included. Lol.
________________________________________________
________________________________________________
Leveling up mods:
Mods lvl up through regular exp obtained from killing monsters. When you transform, you will notice 4 little colored square buttons below your green transform button. These control the amount of exp your mod will receive per kill (100%, 75%, 50%, 25%). The remaining exp, if any, goes to the player's exp bar. In order to see your mod's exp bar, just click on the T icon in the lower left corner of your screen (in the center of the Power Of Capacitance circle).
The 1 stat mods should honestly only be used for show off purposes. Investing time, exp and money on these would be pretty much a waste, since they only offer 1 useful bonus. I suggest trying to get the 3 stat ones, and lvl up those. Or the Cash shop ones, although their price is rather high.
When a mod lvls up, a few changes will occur. Its white stats will increase, and so will the purple ones. The blue stats (if any) will always stay the same. The mod will also gain additional slots every a few lvls, and finally, its energy consumption rate will increase (according to the chart linked earlier). The non CS mods also gain an additional purple stat (random) when they reach lvl 41.
Also, mods shouldn't be used for regular training, since the bonuses, even those on the dur/hp mods, aren't that "important" against the regular monsters. These mods are however much better at massive pvp events, such as sieges or death matches, and also for the high lvl instance dungeons.
It has a few drawbacks though. In order to maintain your transformation, whether it's the alternate robot form, or the animal/vehicle form, you need to use a special type of energy batteries (called "Transform Energy Block"), which are way more expensive than the normal batteries. Also, in order to get decent buffs out of your transforming module (this is the name of the part you need to add to your robot in order to enable the transformation feature), you need first to level/rank it up. The higher the mod's level/rank becomes, the higher its energy consumption becomes, and thus the more expensive it becomes to stay in transformed form. This is the energy consumption chart, credits go to Alucius:
rank 41-45 - 4 points
rank 46-50 - 7 points
rank 51-55 - 10 points
rank 56-60 - 15 points
Note: The transforming feature is not meant for low lvl players. The cost of the transform energy blocks used as batteries is huge, and most of the mods don't give bonuses good enough to compensate the money loss.
________________________________________________
________________________________________________
How to equip them:
Mods work like this. You equip the mod as like you do with any other piece - through the Armor Assembly npc. After that, you need to right click on any blue Transform Energy Block (bought from any supply shop, some bosses also drop them), and it ll automatically provide energy to the mod. The energy will be drained only during the time the mod is activated.
In order to transform into the robot mode, you need to click on the little squarish green button that shows below your health bars. As soon as you do so, your mecha will change into another robot, and the mod's buffs will activate, and remain active until you turn off the mod. After you are transformed into this alternate robot mode, you can then use the transform button in your F2 menu, to transform into the animal/car/jet mode. This mode retains the buffs from the tf mod, but will need its own set of weapons (and skills) in order to attack. These are the TF type weapons.
Tf weapons are usually stronger than the "normal" weapons, but their Power and Cl requirements are also much higher. To compensate for this however, the mod will always provide you an additional amount of Power and Cl.
Since you will be using a new set of weapons in this form, you will also have a new set of skills available for them. These chips are, like cabins and cores, inserted into the transforming mod through the Socketing Service Provider npc. Note that mods will automatically increase the amount of slots they have, when they lvl up. You cannot add slots to a mod through the Part Composing Provider npc.
Regarding drops:
- Low rank chips are dropped by low/med lvl bosses, most assault type bosses in Recruit Base do so quite frequently. Higher rank chips are dropped by the bosses in DV (credits to Cartman1001 for that info).
- The TF weapons are dropped by many medium lvl mobs, and high lvl bosses too. Like normal weapons, its recommended to use only Adv or Adv/Med type weapons.
- The TF mods are dropped by med and high lvl bosses, like the ones in Shadon, Mare Tranquilities, Anion Gravity Zone, Pandora's Lab, etc.
________________________________________________
________________________________________________
Bonuses:
Single stat mods:
Most mods will give, honestly speaking, crappy bonuses. The most common mods will only give you around +45% damage (applies to all weapons), sometimes along with a partial res (eg, armor kinetic res +5, or energy shield explosive res +5, etc). These are dropped, as far as I know, by Shadon, Anion Gravity Zone, and Gumu Disaster Area bosses. Here is a ss:

In this case, a 1 Snipe 01 chip was inserted into that mod, and it also gained some exp.
Double/Triple stat mods:
There are some better mods, that along with those hp and partial res bonuses, will also give you more stats, such as +ar/eshield dur, + flat hp, +ar/eshield dur (% based), etc. These are the best free mods available to players atm. Here is a ss of one of them:

As you can see, this mod greatly overpowers the previous one. These mods are dropped by the following bosses, credits for the info go to Alucius:
- Destroyer (mare): 100% chance of +5 rez(Blue), 50% +500 or more armor/es(Purple), 100% chance +45% or more enhance damage, 10% +direct damage (Purple)
- Scorpian Mech (FB35): 100% chance of +5 rez (Blue), 25% chance +4 shooting range (Blue), 50% +500 or more armor/es (Purple), 100% chance +45% or more enhance damage (Purple), 10% +direct damage (Purple)
- Darlon Elder (FB45):100% chance of +10 rez (Blue), 25% chance +4 shooting range (Blue), 25% chance +1 crit (Blue), 50% +700 armor/es at least (Purple), 100% chance +up to 50% enhance damage (Purple), 10% +direct damage (Purple)
Cash Shop Mods:
Finally, there are the Cash Shop mods, which have way more stats. These special mods are by far the best, here is a ss of one of them:

The exp on that mod doesnt show up, because it was linked in trade chat (I think this mod belongs to Sage, not sure). The other 2, I took the ss from my inventory/warehouse.
I believe the price of the CS mods is about 90 USD atm. Chips not included. Lol.
________________________________________________
________________________________________________
Leveling up mods:
Mods lvl up through regular exp obtained from killing monsters. When you transform, you will notice 4 little colored square buttons below your green transform button. These control the amount of exp your mod will receive per kill (100%, 75%, 50%, 25%). The remaining exp, if any, goes to the player's exp bar. In order to see your mod's exp bar, just click on the T icon in the lower left corner of your screen (in the center of the Power Of Capacitance circle).
The 1 stat mods should honestly only be used for show off purposes. Investing time, exp and money on these would be pretty much a waste, since they only offer 1 useful bonus. I suggest trying to get the 3 stat ones, and lvl up those. Or the Cash shop ones, although their price is rather high.
When a mod lvls up, a few changes will occur. Its white stats will increase, and so will the purple ones. The blue stats (if any) will always stay the same. The mod will also gain additional slots every a few lvls, and finally, its energy consumption rate will increase (according to the chart linked earlier). The non CS mods also gain an additional purple stat (random) when they reach lvl 41.
Also, mods shouldn't be used for regular training, since the bonuses, even those on the dur/hp mods, aren't that "important" against the regular monsters. These mods are however much better at massive pvp events, such as sieges or death matches, and also for the high lvl instance dungeons.
Builds
As I mentioned earlier, the builds in Age of Armor do not depend on the player's stats, but on the armor part's stats. This gives any player the ability to use any build. Here is a list of a few builds.
NOTE:
Its recommended to include Cash Shop perma Wings & r19 purple set parts in all builds. If a build already specifies a jetpack type, you can then transfer the stats from that jetpack to the Cash Shop wings, through the Parts Composing Provider NPC. Also, armor resistance build is pretty much a must, so make sure to have one, apart from any other build you may want to make.
________________________________________________
________________________________________________
Armor/Energy Shield Resistance:
This build focuses on resistance, which lowers the damage you receive. Armor resistance is ultimately a must for all 3 races, but Neo Humans may require a bit more funding, due to their lower base armor durability.
The obvious advantage in this build is its tanking capabilities, although at the expense of a decreased firepower. Here is a chart that shows the damage reduction ratio, credits for the info go to Alucius:
1-75 AR/ESR: 1 Res = 1% damage reduction --------->75R=75%
76-120 AR/ESR: 5 Res = 1% damage reduction ------>80R=76%, 120R=84%
121-160 AR/ESR: 8 Res = 1% damage reduction----->128R=85%. 160R= 89% 161-244 AR/ESR: 12 Res = 1% damage reduction---->172R=90%, 244R=96%
244-294 AR/ESR: 24 Res = 1% damage reduction---->292R=98%
This build uses:
Head:
- rank 2+4 ar/esr head (Anillas Guard Officers, Logu Path Assault Commanders)
- rank 1+2 ar/esr, same as above, but harder to find (Domier Skywalkers, Headman of Darlon in Osider, random lvl 1-4 mobs in Domier & Osider).
Body:
- rank 1+2 ar/esr body (Dommier Guard Commanders, Pontiff of Darlon in Osider)
Arms:
- rank 2+35% hp arms (Dommier Annihilators, Osider Assaults)
- rank 3+4 ar/esr arms (lvl 19 Cargemiller Floater, Soer Cleaners, recommended for full ar/esr)
- rank 17/18 purple arms (they have both hp and huge amounts of dur, dropped by spaceship-like bosses in Luke and some bosses in FB45, temporal use only)
- r1+2 ar/esr arms, hard to find (regular lvl 1-5 mobs in Domier & Osider).
Legs:
- rank 4+6 ar/esr legs (Cargemiller Fury - special version, Soer Gunnery Commanders)
- rank 1+2 ar/esr legs, hard to find (regular lvl 1-5 mobs in Domier & Osider)
- rank 17/18 purple legs (they have both hp and huge amounts of dur, dropped by some bosses in FB45, temporal use only)
Cabin:
- rank 9+10 ar cabin (quest item only for enhanceds, temporal use only)
- anything with large amounts of dur (there are many of these, dropped in Andrew, Shadon, Luke, etc, all for temporal use only)
------ purple rank 17/18 cabins dropped by the north west boss in luke (they have large amounts of durability, temporal use)
------ purple rank 17 cabin, +10 armor res & +50%, dropped by FB40's King Kong.
------ purple rank 19 set cabins +60%hp & +10 resistance, obtainable from tb2 & FB50 I believe.
Core:
- rank 5+20 esr core (quest item in Domier/Yeaslis, only recommended for esr builds, temp use)
- rank 7+10 ar core (quest item, temp use)
- rank 10+10 ar/esr core (Sanbuick Lair Monster King, South Ironophila Maggot King - credits for Mars version go to airstrife, temp use)
- rank 15 purple core, +10 armor res and +50% armor dur, dropped by a boss in FB45.
- rank 16 purple core, +12 armor res and +60% armor dur, dropped by a boss in FB40.
- rank 17 purple core, +15 armor res and +75% armor dur, dropped by last boss in FB35 and one in FB45.
- rank 19 set purple core, 80% hp & 15 res, obtainable from tb2 & FB50 I believe.
Engine:
- rank 7+4 ar/esr engine (Alcaleph, FB15 - Exotic Planet)
- rank 8/9+8 ar/esr engine, hard to find (Dracula/"Dragola", FB20)
Jetpack:
- +1k ar dur jetpack for nats & enh, +500 ar dur for neos, I think fb40. These jetpacks are rather useless endgame anyways, since you will have so much dur, that 1k wont make a difference. I believe the dual lock ones may be a better choice.
At rank 15 or so, depending on which ones you use, these parts in total should add at least +85 base res (20 body, 20 leg, 20 head, 15 engine, 10/20 core) which basically will cancel out ~76% of the damage your armor/es receives. This build is a must at high lvls and endgame pvp/instances.
________________________________________________
________________________________________________
Interval build:
This build used to have the highest dps in game, at the price of a very low survivability. Basically a glass cannon (glass machinegun, actually). Its also a bit expensive to use, it consumes much more ammo and batteries than all other builds (ranked guns consume A LOT of energy per regular shot).
In AoA, different weapon kinds have different re-attack speeds. This is called interval, and ranges from 1200 ms - milliseconds (talons) to 4500 ms (2 handed particle cannons). Skill chips, also modify the interval of the weapon when activated, generally making it slower (to compensate for the added damage, range, etc).
There are several armor parts, most of which cant be reconfigured, that also modify the weapon's interval, but lowering it, and thus making the weapon attack faster. This does not affect skill chips whatsoever though, since their interval modifiers completely ignore changes done by armor parts.
For example, lets picture a 2 handed laser (2400 ms interval), using armor parts that give it -50% interval, and a Brash 1 skill chip (Brash 1 = 140% interval time). Since interval armor parts only affect regular shots, a regular shot will be done in 1200 ms (50% of 2400), while a shot with Brash 1 will still take 3360 ms. Basically, in this example a normal shot can be fired almost 3 times in the amount of time it takes to do 1 Brash shot.
The build uses:
Head:
- rank 12 -20% interval head (quest item in an Ice Planet chain quest, not reconfigurable)
Body:
- rank 1+2 res body (same as res build)
- rank 15+4 critical body (the one used in critical builds, explained below)
Arms:
- rank 1 -15% interval arms, better for enhanceds and neos (Domier Commander Ships & Osider Commander Ships)
- rank 7 -25% interval arms, only available for nat humans (cant remember whether its dropped by Abnormal Crust Beast boss in Exotic Planet, or if its a quest reward)
- rank 17 -30% interval arms, all races, recommended due to its higher base dur & it reaches cap by endgame anyways as well (dropped by the spaceship-like bosses in Luke)
Legs:
- rank 7 purple legs, +50% hp & -10% interval (Flower Bud boss, Exotic Planet)
- since -10% may not be a lot, you can go with the r7 +50% hp or r8 + 55% hp legs dropped by the same boss, and which are reconfigurable
Cabin:
- rank 9 -20% int cabin, quest item only for neos, temporal item
- rank ~13 -10% int cabins, dropped by one of the assaults in Shadon (the one standing in the platform near the East warp zone I think)
- same cabin as resistance build, or critical build (explained below)
Core:
- same core as res build or critical build (explained below)
- any rank -10% interval cores, there are many types of these, lowest being rank 7, dropped by first boss in exotic planet, there are also r11 and 12 versions dropped by bosses in Shadon, one is purple and has +14 shoot range as well.
Engine:
- same engine as res build
- rank 7+10 shoot range engine (Alcaleph, sorta useless for enhanceds due to their lower lock range)
- rank 9+5 critical engine (same as the one for critical build, explained below)
Jetpack:
- -15% int jetpack for nat humans, neos can use the +5 critical one, no idea for enhanceds, all in fb45 I think.
The real interval cap seems to be at ~500 ms, regardless of what your weapon shows (eg, even if the weapon has a 3000 - 2700 interval, the real value stops at ~500 ms).
This build can do a lot of damage in very short amounts of time, but it requires quite some funding to increase its base damage (namely, high rank weapon, enhancers, and tf mod), especially if going vs resistance builds.
For pvp & bossing, interval builds work better as part of a team than soloing. Since some of their parts cant be reconfigured, they tend to have the lowest amounts of durability and resistance, so against endgame resistance type builds, their dps most likely wont be able to kill their opponent in time, before getting 1hit ko'd.
In a team however, they can hide behind the tanks and take care of their opponents quite fast.
Since their overall survivability is lower than that of other builds, you can also go for an all attack build, by using critical parts instead of resistance ones (for body, core, cabin & engine). That way your damage will increase even more, since many of your shots will also do twice as much damage. However, this will take away any of the little resistance you had left.
Note: when used with ranked weapons, this build seems to be calculating the "wrong" interval.
I have done a few tests, on the one hand it seems to be calculating about 75% of the real value (eg, -85% int becomes around -63%, -75% int becomes -56%, etc); but on the other one, the amount it deducts also seems to get smaller as the weapon's rank increases.
I tested a -75% interval build on a Rank 4 Adv 5 Med3 Laser, and a Rank 3 Adv 5 Med 3 Canister. They both had a 3k interval, so logically the build should have deducted 2250 interval (75% off 3k). However, it deducted 1650 off the canister (-55%) and 1500 off the laser (-50%).
The build can anyways be done without need for reconfiguring much stuff, so it doesn't hurt to have it in the warehouse in any case. Optionally, instead of using a ranked weapon, you can use it with a rank 0 weapon which has been upgraded through crystals, since those will not affect its speed, and since its main rank will stay at 0, the build will have full effect on the weapons' interval.
________________________________________________
________________________________________________
Sniper build:
While interval builds work through "weak" yet fast attacks at close-medium range, sniper build works with slower but powerful max range attacks. The build is done by combining dual lock parts, to maximize locking and detecting range, and in some cases + shooting range parts as well (the firing range on ranked weapons increases as their rank goes up anyways). Also, since most mobs and bosses seem to be "blind" past some distances (generally around 75-80 meters), this build helps keeping the player safe away from the danger (most mobs don't aggro if you fly and shoot from that distance), but it doesn't fare very well at close ranges.
There are 2 ways of doing the build - one is focusing on using dual lock parts whenever possible, and using Charge/Snipe type skill chips to compensate for the firing range (slow but very powerful damage per hit), the other way is to sacrifice the dual lock cc/core or hp arm, and replace it for a +shoot range one, to obtain a slightly weaker dph, but much better dps.
Parts used are:
Head:
- rank 3+7 dual lock head (lvl 21 Cargemiller Floaters, Soer Tourer Leaders)
Body:
- same body as res build
- rank 1-20% error of weapon scanning (dropped by low lvl mobs in domier & osider, since you wont have much res as sniper, you can just reconfig the body to endgame to take down RR users way faster)
Arms:
- same hp% arms as res build
- r1 + 6/8 shooting range arms, dropped by Domier Commander Ships and Osider Commander Ships. The +8 one is very very rare, I don't even know if it still drops.
- r6 + 14 shooting range arms, dropped by King of Siden Dissasembly Monsters and I can't remember which of the 2 Special Bosses in General Coronal (I think the Inspector Officer).
The ranged arms may be the best choice, due to armor combining adding damage to them, and they provide the largest range boost possible as well. I believe both the r1 and r6 one should be able to reach cap w/o combining, although this will mostly depend on your luck with the normal reconfigurations, as usual.
Legs:
- rank 7+50% hp to shooting weapons legs (Flower Bud boss, Exotic Planet)
- rank 8+55% hp to shooting weapons legs (Flower Bud boss, Exotic Planet)
- pretty much any rank speed legs, several versions of these, such as rank 7 +1.5 move speed (Flower Bud boss), rank 13+1.5 move speed (Anion Assault Headman), rank 15/17/18 +2.0 move speed (dropped in Luke, cant remember which boss); all used to move away from fast incoming enemies, neos may also want to use another speed part due to their lower base speed.
Enhanceds should use the r3 +1.5 ones (uniques) they can obtain from the Recruit Base quest that continues from "What is [race]", called "Different types of [race]". Nats and neos should use the r7 +1.5 ones.
Cabin:
- rank 9+15 dual lock cabin (nat humans, quest item, temporal use only)
- rank 10 +11 dual lock cabin (Palermo Melter Leader, temporal use only)
- any higher rank cabin with +lock range (many versions of these, dropped in Luke, FB40, FB45)
- purple rank 17/18 cabins such as rank 18 +12 dual lock & +880 ar dur/+580 es dur cabin (cabin boss in Luke), or +11 dual lock & 800 dur r17 version (same boss & map), etc.
- r18 +~20 shoot range or so cabin, dropped in Luke as well I think (use only 1 +shoot range part, either arms, cc or jetpack. Shooting range arms are the best choice due to armor combining.)
- r19 + shoot range and -% scan error, useful for pvp when equipped along with the -% scan error body, dropped by the Mare assault I think (credits to Cartman1001 for the info)
Core:
- same core as res build
- rank 12 purple core with +9 dual lock & 760 ar dur (Shadon)
- rank 9 +9 dual lock core (Dracula/Dragola, not recommended though)
- any of the purple r17+ cores that combine range and scan error or another stat, ultimately up to you
Engine:
- rank 7+9 dual lock engine (Alcaleph).
- rank 6+7 dual lock engine, much easier to find but a bit worse than the 7+9 one (General Coronal Inspector Officers, Siden Alophila, Siden Assault Officer)
Jetpack:
- blue med 1 dual lock jetpack from FB40 (available to all races, although with different stats for each: enh version is +15, nat is +13, neo is +11 dual lock).
- blue med 1 +~16 shoot range jetpack, same instance I think (again, only use 1+ shoot range item at the time, shooting range arms recommended due to armor combining)
There are many cabins & cores that have only locking range, you can use them but try not to let it become higher than your own sense range, or it ll be useless.
This build will (or should) always allow you too see, lock and shoot first than anyone else. The downside are its low survival at close range (since you wont have much res left), and slow firing speed with Charge/Snipe chips (around 6.5 ms with slowest weapons for all races). Also, in crowded maps you wont be able to see at your full range if there are many mobs closer to you. It doesn't seem to work very well in spacewar when fighting against enemies located at very different altitudes either (EG, while I can get a lock on Nicholas Cage while floating ~110 meters above him, the game wont let me fire unless I am within 7x meters from him).
Note: since most ranked weapons just become slower, the Snipe/Charge skills are becoming even more useless. Thus, its better to just go with the 2nd way of making the build, and sacrifice a part for a +shoot range one (arms preferably). This will enable you to get rid of the slow Charge/Snipe chips and instead use the other ones, which will give you a way better dps.
Another alternative exists though, but its rather impossible to be done atm. The Bidirectional Energy Collection TF chips can greatly reduce the charge time of Snipe/Charge type skills, so you can get a good dps by using both chips in conjunction (activate BEC first, and use Charge/Snipe while the BEC effect is active). However, you would need to have them both over rank 6 or so, in order to start seeing decent results, which is easier said than done.Also, the effect wears out every after 60 seconds, so having to transform back and forth to reactivate it may be too much of a hassle.
In any case, ranked weapons tend to increase their range, so once they reach a high enough rank, their improved base range should be more than enough, specially for neos.
Note 2: as the sight range "decreases" in crowded maps, its preferable to stay away from large concentrations of players. I used to lose over 45 range whenever many players were close.
________________________________________________
________________________________________________
Radar Reflection build:
This is another tanker build, but focused on evading attacks rather than withstanding damage. It has an almost identical damage output as the resistance build, since it also sacrifices damage legs. If you have low amounts of ref, this build will be more dependent on "luck", since you never know when a shot will land. When you reach <-1 rr however, this build becomes pretty much the best at most of the pve content in the game (only very few endgame bosses can actually hit with 100% accuracy, so you will be safe most of the time).
Parts used are:
Head:
- rank 10-10% radar reflect head (Balam Roller)
- rank 12-10% radar reflect head (Balam Interceptor Commander)
- rank 13-10% radar reflect head (Coniferous Assault, maybe the Balam one too, this head is the worst one though).
- rank ~14 -20% radar ref head (can't remember well, possibly Arcadia Assault)
Body:
- same body as res build
Arms:
- same arms as res build, either hp or res
Legs:
- rank 7 -10% rr legs (Flower Bud boss, General Coronal Commander, Siden's assault too)
Cabin:
- rank 12/13-10% rr control cabin (Leader of Bioboosted Armors/one of the assaults in Shadon, respectively - only for temporal use)
- same cabins as res build since you really shouldn't need an rr cabin
Core:
- same core as res build
Engine:
- rank 1-10% rr engine (Domier Annihilator, Osider Assaults perhaps, hard to find)
- rank 2-10% rr engine (Domier Guard Commander Leader, Pontiff Leader of Darlon, very common drop)
Jetpack:
- blue med 1 -20% rr jetpack for nats, neos & enh get a -10% one, all in FB45. I think they are all rather useless endgame anyways, since the parts can get to -105% rr on their own.
This tanking build is, if unprepared, much harder to take down than resistance build. However, its effects are sorta nullified against some bosses (such as some in Hate Valley/Dark Valley, since they have ~1 scan error), and can be countered by the other builds, either by reconfiguring rank 1 parts with -% error of weapon scanning (at rank 15 they should have around -54% each, which leaves your weapon scan error at around 25-50); or by using missiles. Also, the Haros (usable items) sold by the Deathmatch Supply npc can also greatly lower the weapon's scan error while inside DM.
At rank 15++, the rr build should have AT LEAST -9x% radar ref (-1x head, -2x leg, -2x engine, -10 cabin, -20 jetpack). Missile build is also useful against rr builds, since missiles' scan error is of 1-5 points usually, meaning they will NEVER miss. Generally missiles are chosen against rr builds, since they just need a good enhancer and ammo to deal high damage, which can be easily strapped on to any build (plus, purple rank 19 set parts greatly increase missile damage).
PvE wise, the build is just great, save for the aforementioned bosses.
________________________________________________
________________________________________________
Critical build:
Like the interval build, this build is another form of glass cannon. It sacrifices pretty much all resistance for max dph, by using +critical hit parts whenever possible. Therefore, for pvp/bossing it also works better in a team rather than alone. With this build, you get the max dph possible (2x total damage if the critical hit connects), but in exchange for survivability. The build usually consists of:
Head:
- rank 1+2 crit head (dropped by lvl 1-5 mobs in both Domier and Osider)
Body:
- same as res build
- rank 15+4 crit body (quest item in Luke I think)
Arms:
- same hp% arms as res build
- r9 or 10 crit arms (FB20's Dracula) - credits to Cartman1001 & Arcanjo.
Legs:
- rank 7+50% hp legs (Flower Bud boss)
- rank 8+55% hp legs (Flower Bud boss)
Cabin:
- rank 18+5 crit cabin (dropped in Luke I think, there is also a rank ~16 one dropped by Element Guard Commander in Element Digging Valley I believe)
- same as res build
Core:
- any +5 or more crit core (rank 7+3 are dropped by first boss in ep, there are rank 17/18 ones in Luke as well I think)
- same as res build
Engine:
- rank 9+5 crit engine (quest item)
- rank 7+3 crit engine (Alcaleph)
Jetpack:
- I +5 crit jetpack for neos only, not sure in which dv instance it drops though.
At around rank 15, the build should have at least ~35 crit (1x head, 1x engine, 5-7 body, + core/cabin/jetpack), and 1 crit = 1% chance of doing a critical shot. The cap per part is currently 14 crit.
Critical shots will do about twice your total damage (after the ammo multiplier is calculated). Also, some parts can be found with a Deadly Strike stat instead of Critical (the cabin & core, basically), the difference is that deadly strike shots also ignore your enemy's resistance (useful vs res builds, since critical shots will only do 2x as much damage, while deadly also bypasses all the res). This build has perhaps the lowest survivability of all, since it gets most of its resistance out of the energy shield/armor hardeners on the core, but it does have more durability than an interval build. And as a bonus, any epic weapon above rank 3 will get a + critical hit bonus if its used along with a critical build. The bonus seems to be based on how much crit your build has atm of equipping the weapon.
I made a few tests with a rank 3 Advanced 5 Medium 3 Laser:
- For 10 base crit, it increased to 16.
- For 21 base crit, it became 33
- For 28 base crit, it became 46.
Note: the block stat from shield builds cancels out their opponent's crit/deadly strike chance.
________________________________________________
________________________________________________
Missile Build (not recommended to nat humans for pve, since they already have canisters)
This is an expensive build, since it depends on high rank ammo, missile enhancers and combined armor parts to do good/high damage. This build also differs on other builds due to the fact that there are MANY parts which already come "ready to be used". Also, since the armor parts that provide + missile damage are VERY weak, there are a few different ways of making this build. This would be an example:
Head:
- r1-30% interval of shoulder weapon head (or any rank actually, since -30% is alot)
- same head as sniper build (since the highest rank missile weapons have a 80m fire range or so)
- same head as res build
Body:
- same as res build
- r15/16/17 purple body with missile damage & missile interval (a few of these, dropped in Luke & Shadon's north-most assault, also in some DV instances).
Arms/Legs:
- r1-30% interval of shoulder weapon arms and legs (or any rank again)
- same arms/legs as res build.
- r9 legs with +0.x damage to shoulder weapons, dropped by either the 1st or 2nd boss in FB18. The damage even reconfigured is too low anyways.
Cabin/Core:
- any +0.5 or higher damage of shoulder weapon core and cabin (rather pointless, since 0.5 is too weak)
- same as res build
Engine:
- r1 +0.3 damage of shoulder weapon engine ( again, rather useless since the damage wont be very high even at rank 14+)
- same as res/sniper build
As I have explained already in the Weapons section, the real damage of this build comes from the enhancers, combined parts & ammo. With a lot of luck (and sacrificing pretty much all survival), you can get + 4.0 or so damage out of all your reconfigured armor parts (roughly 1k damage if you use missile ammo 5). On the other hand, a rank 5 missile enhancer applied to a 6.0 missile launcher (this type of weapon exists for transforming mode) will give you +4.8 (10.8 total) , and a rank 6 enhancer would give +8.4 (14.4 total). With this in mind, you may just want to do a full tanking type build, or sniper, or any build at all, and just throw in the highest possible missile enhancer, since the damage you can get from parts is quite low when compared to the enhancers. Transforming mods also affect missile launchers, increasing the damage even more than what armor parts could.
Note: this build greatly benefits from the purple rank 19 set armors, since they give large amounts of damage bonuses. So the best may be to just choose any other build, and strap a couple of missiles onto it.
________________________________________________
________________________________________________
Shield Build:
This is another tanking build, which focuses in increasing the shield's resistance, rather than the armor's. For pvp purposes, its important to take into account the fact that neos can nullify part of the target's shield resistance (Nebula skill chip), electro magnetic neos can skip the target's shield itself (Sunglow skill chip), and some ranked weapons can cancel part of the shield's resistance/block rate as well. At pve its a bit better since mobs don't posses such abilities.
Unlike other builds, this one has a few useful high lvl purple parts, which boost both the shield stats and the 1h weapon damage, and depends on less reconfigurable parts compared to the other tanking type builds. The parts used are:
Head:
- there are no heads with +shield resistance nor block, so the decision is up to the user. Good choices could be +armor resistance, or -error of weapon scanning (for pvp).
Body:
- rank 12 +16 shield res body, dropped by the Andrew and Zion Assault type Bosses
- rank 16 or so purple bodies with +100% shield dur & +150% recovery rate. The res bodies are better for endgame, but these ones are useful for a long yet temporal use.
Arms/Legs:
- purple rank 12/15/16/17/18 etc arms and legs, the low rank ones are dropped by the Leaders of Bioboosted Armors in Shadon, and the rest some bosses in FB35, 40 & 45, they come with +hp% to 1h weapons, and also either shield dur% or block.
- rank 14+24 block rate arms, dropped in Arcadia, I guess in Lasia too, these may be the best for serious shield builds.
Cabin:
- purple rank 12 , dropped by the Leaders of Bioboosted Armors in Shadon as well (temporal use only, has +11 shield res & +11 block)
- r16/17/18 purple cc with both shield res and block (best one has +20 all shield res & +20 block), dropped in some DV instances (fb40 & 45 I think)
Core:
- rank 9+12 res, dropped by the first boss in FB20.
- rank 16/17/18 purple cores with stats similar to the cabins of same rank, dropped in some DV instances (again, best one has +20 all shield res & +20 block).
Engine:
- rank 1+ 8 shield res engine, dropped by Domier Annihilators & perhaps Osider Assaults (very hard to get, r1+4 is much more common). Also dropped by common low lvl mobs in Domier/Osider.
- rank 3 + 12 shield res engine, dropped by the Anilas and West Logu assaults I believe.
Jetpack:
- +12 shield resist jetpack, not sure in which DV instance it drops, guess FB40/45 just like pretty much all other Jetpacks.
Equipping a shield will not automatically cause it to block all attacks. They work on a chance based system, similar to critical shots. The stat used in this case is block, I believe 1 block = 1% chance to block. This doesn't mean that the user will receive no damage, but instead, that the shield will receive it. So the higher the block stat, the higher the chance.
Shields usually come with 2 specific resistances (out of the 4 resistances - kinetic, explosive, electro & thermic), and some block stat. They have their own durability value, which recovers on its own (much faster than armor & energy shield), and can be healed by the Neo Human's basic buff skill (it heals some of its dur and adds some resistance to it I think). Rainbow wont do anything to shields.
While +block rate arms were used previously to achieve the 100 block (the arms cap at +65 block), now this can be easily done by using:
- r~17 purple cabin with +20 block & +20 res
- r~17 purple core with +20 block & +20 res
- r~17/18 purple arms with +~80% to 1h combat weapons & +~26 block (arm has also ~14 base block)
- any adv 5/med 3 shield, they include +30 base block
Adding the block of all parts should get you around 10x, which is pretty much all you need.
However, note that the arm only gives a bonus to combat weapons. If you are using shooting ones, you will be better off with the block one, since you can combine it with a r19 part and get even more bonus stats.
Im still not sure of how much res can the build achieve, so far I can guess that around 167-207 might not be impossible, since:
- the r~17 purple core and cabin ll give you +40 base res total
- The cap for shield res parts is 45 I believe, assuming both the body & engine reach it, then that's another +90 res total (130 total)
- the r7 shield hardeners from cs give +25 res (155)
- the res jetpack gives +12 (+167 total res)
That should cancel out around 89% of the damage the shield receives, without counting the base resistances from the shield, which give +~40 to 2 specific types (for each shield there are 2 versions of it, each giving res bonus against 2 of the 4 damage types). For some reason, shields seem to keep their resistances active even while their durability is at 0 (which means the shield is "dead"). I don't know if this is a bug or not.
Note that endgame shields only have about 5k durability. With purple parts + research though, you should be able to get an additional 10k durability or more, without even counting the enhancers.
One "advantage" the build gets, is that you can swap shields mid-fight, and the new one will be at full health (as long as it was at full health before starting the fight, of course). The damaged shields in your inv will not recover until you are out of fighting mode though, but if you carry many shields in your inv, you can go swapping between them as you need. There are no regular repair packages for shields though, only cs ones.
NOTE:
Its recommended to include Cash Shop perma Wings & r19 purple set parts in all builds. If a build already specifies a jetpack type, you can then transfer the stats from that jetpack to the Cash Shop wings, through the Parts Composing Provider NPC. Also, armor resistance build is pretty much a must, so make sure to have one, apart from any other build you may want to make.
________________________________________________
________________________________________________
Armor/Energy Shield Resistance:
This build focuses on resistance, which lowers the damage you receive. Armor resistance is ultimately a must for all 3 races, but Neo Humans may require a bit more funding, due to their lower base armor durability.
The obvious advantage in this build is its tanking capabilities, although at the expense of a decreased firepower. Here is a chart that shows the damage reduction ratio, credits for the info go to Alucius:
1-75 AR/ESR: 1 Res = 1% damage reduction --------->75R=75%
76-120 AR/ESR: 5 Res = 1% damage reduction ------>80R=76%, 120R=84%
121-160 AR/ESR: 8 Res = 1% damage reduction----->128R=85%. 160R= 89% 161-244 AR/ESR: 12 Res = 1% damage reduction---->172R=90%, 244R=96%
244-294 AR/ESR: 24 Res = 1% damage reduction---->292R=98%
This build uses:
Head:
- rank 2+4 ar/esr head (Anillas Guard Officers, Logu Path Assault Commanders)
- rank 1+2 ar/esr, same as above, but harder to find (Domier Skywalkers, Headman of Darlon in Osider, random lvl 1-4 mobs in Domier & Osider).
Body:
- rank 1+2 ar/esr body (Dommier Guard Commanders, Pontiff of Darlon in Osider)
Arms:
- rank 2+35% hp arms (Dommier Annihilators, Osider Assaults)
- rank 3+4 ar/esr arms (lvl 19 Cargemiller Floater, Soer Cleaners, recommended for full ar/esr)
- rank 17/18 purple arms (they have both hp and huge amounts of dur, dropped by spaceship-like bosses in Luke and some bosses in FB45, temporal use only)
- r1+2 ar/esr arms, hard to find (regular lvl 1-5 mobs in Domier & Osider).
Legs:
- rank 4+6 ar/esr legs (Cargemiller Fury - special version, Soer Gunnery Commanders)
- rank 1+2 ar/esr legs, hard to find (regular lvl 1-5 mobs in Domier & Osider)
- rank 17/18 purple legs (they have both hp and huge amounts of dur, dropped by some bosses in FB45, temporal use only)
Cabin:
- rank 9+10 ar cabin (quest item only for enhanceds, temporal use only)
- anything with large amounts of dur (there are many of these, dropped in Andrew, Shadon, Luke, etc, all for temporal use only)
------ purple rank 17/18 cabins dropped by the north west boss in luke (they have large amounts of durability, temporal use)
------ purple rank 17 cabin, +10 armor res & +50%, dropped by FB40's King Kong.
------ purple rank 19 set cabins +60%hp & +10 resistance, obtainable from tb2 & FB50 I believe.
Core:
- rank 5+20 esr core (quest item in Domier/Yeaslis, only recommended for esr builds, temp use)
- rank 7+10 ar core (quest item, temp use)
- rank 10+10 ar/esr core (Sanbuick Lair Monster King, South Ironophila Maggot King - credits for Mars version go to airstrife, temp use)
- rank 15 purple core, +10 armor res and +50% armor dur, dropped by a boss in FB45.
- rank 16 purple core, +12 armor res and +60% armor dur, dropped by a boss in FB40.
- rank 17 purple core, +15 armor res and +75% armor dur, dropped by last boss in FB35 and one in FB45.
- rank 19 set purple core, 80% hp & 15 res, obtainable from tb2 & FB50 I believe.
Engine:
- rank 7+4 ar/esr engine (Alcaleph, FB15 - Exotic Planet)
- rank 8/9+8 ar/esr engine, hard to find (Dracula/"Dragola", FB20)
Jetpack:
- +1k ar dur jetpack for nats & enh, +500 ar dur for neos, I think fb40. These jetpacks are rather useless endgame anyways, since you will have so much dur, that 1k wont make a difference. I believe the dual lock ones may be a better choice.
At rank 15 or so, depending on which ones you use, these parts in total should add at least +85 base res (20 body, 20 leg, 20 head, 15 engine, 10/20 core) which basically will cancel out ~76% of the damage your armor/es receives. This build is a must at high lvls and endgame pvp/instances.
________________________________________________
________________________________________________
Interval build:
This build used to have the highest dps in game, at the price of a very low survivability. Basically a glass cannon (glass machinegun, actually). Its also a bit expensive to use, it consumes much more ammo and batteries than all other builds (ranked guns consume A LOT of energy per regular shot).
In AoA, different weapon kinds have different re-attack speeds. This is called interval, and ranges from 1200 ms - milliseconds (talons) to 4500 ms (2 handed particle cannons). Skill chips, also modify the interval of the weapon when activated, generally making it slower (to compensate for the added damage, range, etc).
There are several armor parts, most of which cant be reconfigured, that also modify the weapon's interval, but lowering it, and thus making the weapon attack faster. This does not affect skill chips whatsoever though, since their interval modifiers completely ignore changes done by armor parts.
For example, lets picture a 2 handed laser (2400 ms interval), using armor parts that give it -50% interval, and a Brash 1 skill chip (Brash 1 = 140% interval time). Since interval armor parts only affect regular shots, a regular shot will be done in 1200 ms (50% of 2400), while a shot with Brash 1 will still take 3360 ms. Basically, in this example a normal shot can be fired almost 3 times in the amount of time it takes to do 1 Brash shot.
The build uses:
Head:
- rank 12 -20% interval head (quest item in an Ice Planet chain quest, not reconfigurable)
Body:
- rank 1+2 res body (same as res build)
- rank 15+4 critical body (the one used in critical builds, explained below)
Arms:
- rank 1 -15% interval arms, better for enhanceds and neos (Domier Commander Ships & Osider Commander Ships)
- rank 7 -25% interval arms, only available for nat humans (cant remember whether its dropped by Abnormal Crust Beast boss in Exotic Planet, or if its a quest reward)
- rank 17 -30% interval arms, all races, recommended due to its higher base dur & it reaches cap by endgame anyways as well (dropped by the spaceship-like bosses in Luke)
Legs:
- rank 7 purple legs, +50% hp & -10% interval (Flower Bud boss, Exotic Planet)
- since -10% may not be a lot, you can go with the r7 +50% hp or r8 + 55% hp legs dropped by the same boss, and which are reconfigurable
Cabin:
- rank 9 -20% int cabin, quest item only for neos, temporal item
- rank ~13 -10% int cabins, dropped by one of the assaults in Shadon (the one standing in the platform near the East warp zone I think)
- same cabin as resistance build, or critical build (explained below)
Core:
- same core as res build or critical build (explained below)
- any rank -10% interval cores, there are many types of these, lowest being rank 7, dropped by first boss in exotic planet, there are also r11 and 12 versions dropped by bosses in Shadon, one is purple and has +14 shoot range as well.
Engine:
- same engine as res build
- rank 7+10 shoot range engine (Alcaleph, sorta useless for enhanceds due to their lower lock range)
- rank 9+5 critical engine (same as the one for critical build, explained below)
Jetpack:
- -15% int jetpack for nat humans, neos can use the +5 critical one, no idea for enhanceds, all in fb45 I think.
The real interval cap seems to be at ~500 ms, regardless of what your weapon shows (eg, even if the weapon has a 3000 - 2700 interval, the real value stops at ~500 ms).
This build can do a lot of damage in very short amounts of time, but it requires quite some funding to increase its base damage (namely, high rank weapon, enhancers, and tf mod), especially if going vs resistance builds.
For pvp & bossing, interval builds work better as part of a team than soloing. Since some of their parts cant be reconfigured, they tend to have the lowest amounts of durability and resistance, so against endgame resistance type builds, their dps most likely wont be able to kill their opponent in time, before getting 1hit ko'd.
In a team however, they can hide behind the tanks and take care of their opponents quite fast.
Since their overall survivability is lower than that of other builds, you can also go for an all attack build, by using critical parts instead of resistance ones (for body, core, cabin & engine). That way your damage will increase even more, since many of your shots will also do twice as much damage. However, this will take away any of the little resistance you had left.
Note: when used with ranked weapons, this build seems to be calculating the "wrong" interval.
I have done a few tests, on the one hand it seems to be calculating about 75% of the real value (eg, -85% int becomes around -63%, -75% int becomes -56%, etc); but on the other one, the amount it deducts also seems to get smaller as the weapon's rank increases.
I tested a -75% interval build on a Rank 4 Adv 5 Med3 Laser, and a Rank 3 Adv 5 Med 3 Canister. They both had a 3k interval, so logically the build should have deducted 2250 interval (75% off 3k). However, it deducted 1650 off the canister (-55%) and 1500 off the laser (-50%).
The build can anyways be done without need for reconfiguring much stuff, so it doesn't hurt to have it in the warehouse in any case. Optionally, instead of using a ranked weapon, you can use it with a rank 0 weapon which has been upgraded through crystals, since those will not affect its speed, and since its main rank will stay at 0, the build will have full effect on the weapons' interval.
________________________________________________
________________________________________________
Sniper build:
While interval builds work through "weak" yet fast attacks at close-medium range, sniper build works with slower but powerful max range attacks. The build is done by combining dual lock parts, to maximize locking and detecting range, and in some cases + shooting range parts as well (the firing range on ranked weapons increases as their rank goes up anyways). Also, since most mobs and bosses seem to be "blind" past some distances (generally around 75-80 meters), this build helps keeping the player safe away from the danger (most mobs don't aggro if you fly and shoot from that distance), but it doesn't fare very well at close ranges.
There are 2 ways of doing the build - one is focusing on using dual lock parts whenever possible, and using Charge/Snipe type skill chips to compensate for the firing range (slow but very powerful damage per hit), the other way is to sacrifice the dual lock cc/core or hp arm, and replace it for a +shoot range one, to obtain a slightly weaker dph, but much better dps.
Parts used are:
Head:
- rank 3+7 dual lock head (lvl 21 Cargemiller Floaters, Soer Tourer Leaders)
Body:
- same body as res build
- rank 1-20% error of weapon scanning (dropped by low lvl mobs in domier & osider, since you wont have much res as sniper, you can just reconfig the body to endgame to take down RR users way faster)
Arms:
- same hp% arms as res build
- r1 + 6/8 shooting range arms, dropped by Domier Commander Ships and Osider Commander Ships. The +8 one is very very rare, I don't even know if it still drops.
- r6 + 14 shooting range arms, dropped by King of Siden Dissasembly Monsters and I can't remember which of the 2 Special Bosses in General Coronal (I think the Inspector Officer).
The ranged arms may be the best choice, due to armor combining adding damage to them, and they provide the largest range boost possible as well. I believe both the r1 and r6 one should be able to reach cap w/o combining, although this will mostly depend on your luck with the normal reconfigurations, as usual.
Legs:
- rank 7+50% hp to shooting weapons legs (Flower Bud boss, Exotic Planet)
- rank 8+55% hp to shooting weapons legs (Flower Bud boss, Exotic Planet)
- pretty much any rank speed legs, several versions of these, such as rank 7 +1.5 move speed (Flower Bud boss), rank 13+1.5 move speed (Anion Assault Headman), rank 15/17/18 +2.0 move speed (dropped in Luke, cant remember which boss); all used to move away from fast incoming enemies, neos may also want to use another speed part due to their lower base speed.
Enhanceds should use the r3 +1.5 ones (uniques) they can obtain from the Recruit Base quest that continues from "What is [race]", called "Different types of [race]". Nats and neos should use the r7 +1.5 ones.
Cabin:
- rank 9+15 dual lock cabin (nat humans, quest item, temporal use only)
- rank 10 +11 dual lock cabin (Palermo Melter Leader, temporal use only)
- any higher rank cabin with +lock range (many versions of these, dropped in Luke, FB40, FB45)
- purple rank 17/18 cabins such as rank 18 +12 dual lock & +880 ar dur/+580 es dur cabin (cabin boss in Luke), or +11 dual lock & 800 dur r17 version (same boss & map), etc.
- r18 +~20 shoot range or so cabin, dropped in Luke as well I think (use only 1 +shoot range part, either arms, cc or jetpack. Shooting range arms are the best choice due to armor combining.)
- r19 + shoot range and -% scan error, useful for pvp when equipped along with the -% scan error body, dropped by the Mare assault I think (credits to Cartman1001 for the info)
Core:
- same core as res build
- rank 12 purple core with +9 dual lock & 760 ar dur (Shadon)
- rank 9 +9 dual lock core (Dracula/Dragola, not recommended though)
- any of the purple r17+ cores that combine range and scan error or another stat, ultimately up to you
Engine:
- rank 7+9 dual lock engine (Alcaleph).
- rank 6+7 dual lock engine, much easier to find but a bit worse than the 7+9 one (General Coronal Inspector Officers, Siden Alophila, Siden Assault Officer)
Jetpack:
- blue med 1 dual lock jetpack from FB40 (available to all races, although with different stats for each: enh version is +15, nat is +13, neo is +11 dual lock).
- blue med 1 +~16 shoot range jetpack, same instance I think (again, only use 1+ shoot range item at the time, shooting range arms recommended due to armor combining)
There are many cabins & cores that have only locking range, you can use them but try not to let it become higher than your own sense range, or it ll be useless.
This build will (or should) always allow you too see, lock and shoot first than anyone else. The downside are its low survival at close range (since you wont have much res left), and slow firing speed with Charge/Snipe chips (around 6.5 ms with slowest weapons for all races). Also, in crowded maps you wont be able to see at your full range if there are many mobs closer to you. It doesn't seem to work very well in spacewar when fighting against enemies located at very different altitudes either (EG, while I can get a lock on Nicholas Cage while floating ~110 meters above him, the game wont let me fire unless I am within 7x meters from him).
Note: since most ranked weapons just become slower, the Snipe/Charge skills are becoming even more useless. Thus, its better to just go with the 2nd way of making the build, and sacrifice a part for a +shoot range one (arms preferably). This will enable you to get rid of the slow Charge/Snipe chips and instead use the other ones, which will give you a way better dps.
Another alternative exists though, but its rather impossible to be done atm. The Bidirectional Energy Collection TF chips can greatly reduce the charge time of Snipe/Charge type skills, so you can get a good dps by using both chips in conjunction (activate BEC first, and use Charge/Snipe while the BEC effect is active). However, you would need to have them both over rank 6 or so, in order to start seeing decent results, which is easier said than done.Also, the effect wears out every after 60 seconds, so having to transform back and forth to reactivate it may be too much of a hassle.
In any case, ranked weapons tend to increase their range, so once they reach a high enough rank, their improved base range should be more than enough, specially for neos.
Note 2: as the sight range "decreases" in crowded maps, its preferable to stay away from large concentrations of players. I used to lose over 45 range whenever many players were close.
________________________________________________
________________________________________________
Radar Reflection build:
This is another tanker build, but focused on evading attacks rather than withstanding damage. It has an almost identical damage output as the resistance build, since it also sacrifices damage legs. If you have low amounts of ref, this build will be more dependent on "luck", since you never know when a shot will land. When you reach <-1 rr however, this build becomes pretty much the best at most of the pve content in the game (only very few endgame bosses can actually hit with 100% accuracy, so you will be safe most of the time).
Parts used are:
Head:
- rank 10-10% radar reflect head (Balam Roller)
- rank 12-10% radar reflect head (Balam Interceptor Commander)
- rank 13-10% radar reflect head (Coniferous Assault, maybe the Balam one too, this head is the worst one though).
- rank ~14 -20% radar ref head (can't remember well, possibly Arcadia Assault)
Body:
- same body as res build
Arms:
- same arms as res build, either hp or res
Legs:
- rank 7 -10% rr legs (Flower Bud boss, General Coronal Commander, Siden's assault too)
Cabin:
- rank 12/13-10% rr control cabin (Leader of Bioboosted Armors/one of the assaults in Shadon, respectively - only for temporal use)
- same cabins as res build since you really shouldn't need an rr cabin
Core:
- same core as res build
Engine:
- rank 1-10% rr engine (Domier Annihilator, Osider Assaults perhaps, hard to find)
- rank 2-10% rr engine (Domier Guard Commander Leader, Pontiff Leader of Darlon, very common drop)
Jetpack:
- blue med 1 -20% rr jetpack for nats, neos & enh get a -10% one, all in FB45. I think they are all rather useless endgame anyways, since the parts can get to -105% rr on their own.
This tanking build is, if unprepared, much harder to take down than resistance build. However, its effects are sorta nullified against some bosses (such as some in Hate Valley/Dark Valley, since they have ~1 scan error), and can be countered by the other builds, either by reconfiguring rank 1 parts with -% error of weapon scanning (at rank 15 they should have around -54% each, which leaves your weapon scan error at around 25-50); or by using missiles. Also, the Haros (usable items) sold by the Deathmatch Supply npc can also greatly lower the weapon's scan error while inside DM.
At rank 15++, the rr build should have AT LEAST -9x% radar ref (-1x head, -2x leg, -2x engine, -10 cabin, -20 jetpack). Missile build is also useful against rr builds, since missiles' scan error is of 1-5 points usually, meaning they will NEVER miss. Generally missiles are chosen against rr builds, since they just need a good enhancer and ammo to deal high damage, which can be easily strapped on to any build (plus, purple rank 19 set parts greatly increase missile damage).
PvE wise, the build is just great, save for the aforementioned bosses.
________________________________________________
________________________________________________
Critical build:
Like the interval build, this build is another form of glass cannon. It sacrifices pretty much all resistance for max dph, by using +critical hit parts whenever possible. Therefore, for pvp/bossing it also works better in a team rather than alone. With this build, you get the max dph possible (2x total damage if the critical hit connects), but in exchange for survivability. The build usually consists of:
Head:
- rank 1+2 crit head (dropped by lvl 1-5 mobs in both Domier and Osider)
Body:
- same as res build
- rank 15+4 crit body (quest item in Luke I think)
Arms:
- same hp% arms as res build
- r9 or 10 crit arms (FB20's Dracula) - credits to Cartman1001 & Arcanjo.
Legs:
- rank 7+50% hp legs (Flower Bud boss)
- rank 8+55% hp legs (Flower Bud boss)
Cabin:
- rank 18+5 crit cabin (dropped in Luke I think, there is also a rank ~16 one dropped by Element Guard Commander in Element Digging Valley I believe)
- same as res build
Core:
- any +5 or more crit core (rank 7+3 are dropped by first boss in ep, there are rank 17/18 ones in Luke as well I think)
- same as res build
Engine:
- rank 9+5 crit engine (quest item)
- rank 7+3 crit engine (Alcaleph)
Jetpack:
- I +5 crit jetpack for neos only, not sure in which dv instance it drops though.
At around rank 15, the build should have at least ~35 crit (1x head, 1x engine, 5-7 body, + core/cabin/jetpack), and 1 crit = 1% chance of doing a critical shot. The cap per part is currently 14 crit.
Critical shots will do about twice your total damage (after the ammo multiplier is calculated). Also, some parts can be found with a Deadly Strike stat instead of Critical (the cabin & core, basically), the difference is that deadly strike shots also ignore your enemy's resistance (useful vs res builds, since critical shots will only do 2x as much damage, while deadly also bypasses all the res). This build has perhaps the lowest survivability of all, since it gets most of its resistance out of the energy shield/armor hardeners on the core, but it does have more durability than an interval build. And as a bonus, any epic weapon above rank 3 will get a + critical hit bonus if its used along with a critical build. The bonus seems to be based on how much crit your build has atm of equipping the weapon.
I made a few tests with a rank 3 Advanced 5 Medium 3 Laser:
- For 10 base crit, it increased to 16.
- For 21 base crit, it became 33
- For 28 base crit, it became 46.
Note: the block stat from shield builds cancels out their opponent's crit/deadly strike chance.
________________________________________________
________________________________________________
Missile Build (not recommended to nat humans for pve, since they already have canisters)
This is an expensive build, since it depends on high rank ammo, missile enhancers and combined armor parts to do good/high damage. This build also differs on other builds due to the fact that there are MANY parts which already come "ready to be used". Also, since the armor parts that provide + missile damage are VERY weak, there are a few different ways of making this build. This would be an example:
Head:
- r1-30% interval of shoulder weapon head (or any rank actually, since -30% is alot)
- same head as sniper build (since the highest rank missile weapons have a 80m fire range or so)
- same head as res build
Body:
- same as res build
- r15/16/17 purple body with missile damage & missile interval (a few of these, dropped in Luke & Shadon's north-most assault, also in some DV instances).
Arms/Legs:
- r1-30% interval of shoulder weapon arms and legs (or any rank again)
- same arms/legs as res build.
- r9 legs with +0.x damage to shoulder weapons, dropped by either the 1st or 2nd boss in FB18. The damage even reconfigured is too low anyways.
Cabin/Core:
- any +0.5 or higher damage of shoulder weapon core and cabin (rather pointless, since 0.5 is too weak)
- same as res build
Engine:
- r1 +0.3 damage of shoulder weapon engine ( again, rather useless since the damage wont be very high even at rank 14+)
- same as res/sniper build
As I have explained already in the Weapons section, the real damage of this build comes from the enhancers, combined parts & ammo. With a lot of luck (and sacrificing pretty much all survival), you can get + 4.0 or so damage out of all your reconfigured armor parts (roughly 1k damage if you use missile ammo 5). On the other hand, a rank 5 missile enhancer applied to a 6.0 missile launcher (this type of weapon exists for transforming mode) will give you +4.8 (10.8 total) , and a rank 6 enhancer would give +8.4 (14.4 total). With this in mind, you may just want to do a full tanking type build, or sniper, or any build at all, and just throw in the highest possible missile enhancer, since the damage you can get from parts is quite low when compared to the enhancers. Transforming mods also affect missile launchers, increasing the damage even more than what armor parts could.
Note: this build greatly benefits from the purple rank 19 set armors, since they give large amounts of damage bonuses. So the best may be to just choose any other build, and strap a couple of missiles onto it.
________________________________________________
________________________________________________
Shield Build:
This is another tanking build, which focuses in increasing the shield's resistance, rather than the armor's. For pvp purposes, its important to take into account the fact that neos can nullify part of the target's shield resistance (Nebula skill chip), electro magnetic neos can skip the target's shield itself (Sunglow skill chip), and some ranked weapons can cancel part of the shield's resistance/block rate as well. At pve its a bit better since mobs don't posses such abilities.
Unlike other builds, this one has a few useful high lvl purple parts, which boost both the shield stats and the 1h weapon damage, and depends on less reconfigurable parts compared to the other tanking type builds. The parts used are:
Head:
- there are no heads with +shield resistance nor block, so the decision is up to the user. Good choices could be +armor resistance, or -error of weapon scanning (for pvp).
Body:
- rank 12 +16 shield res body, dropped by the Andrew and Zion Assault type Bosses
- rank 16 or so purple bodies with +100% shield dur & +150% recovery rate. The res bodies are better for endgame, but these ones are useful for a long yet temporal use.
Arms/Legs:
- purple rank 12/15/16/17/18 etc arms and legs, the low rank ones are dropped by the Leaders of Bioboosted Armors in Shadon, and the rest some bosses in FB35, 40 & 45, they come with +hp% to 1h weapons, and also either shield dur% or block.
- rank 14+24 block rate arms, dropped in Arcadia, I guess in Lasia too, these may be the best for serious shield builds.
Cabin:
- purple rank 12 , dropped by the Leaders of Bioboosted Armors in Shadon as well (temporal use only, has +11 shield res & +11 block)
- r16/17/18 purple cc with both shield res and block (best one has +20 all shield res & +20 block), dropped in some DV instances (fb40 & 45 I think)
Core:
- rank 9+12 res, dropped by the first boss in FB20.
- rank 16/17/18 purple cores with stats similar to the cabins of same rank, dropped in some DV instances (again, best one has +20 all shield res & +20 block).
Engine:
- rank 1+ 8 shield res engine, dropped by Domier Annihilators & perhaps Osider Assaults (very hard to get, r1+4 is much more common). Also dropped by common low lvl mobs in Domier/Osider.
- rank 3 + 12 shield res engine, dropped by the Anilas and West Logu assaults I believe.
Jetpack:
- +12 shield resist jetpack, not sure in which DV instance it drops, guess FB40/45 just like pretty much all other Jetpacks.
Equipping a shield will not automatically cause it to block all attacks. They work on a chance based system, similar to critical shots. The stat used in this case is block, I believe 1 block = 1% chance to block. This doesn't mean that the user will receive no damage, but instead, that the shield will receive it. So the higher the block stat, the higher the chance.
Shields usually come with 2 specific resistances (out of the 4 resistances - kinetic, explosive, electro & thermic), and some block stat. They have their own durability value, which recovers on its own (much faster than armor & energy shield), and can be healed by the Neo Human's basic buff skill (it heals some of its dur and adds some resistance to it I think). Rainbow wont do anything to shields.
While +block rate arms were used previously to achieve the 100 block (the arms cap at +65 block), now this can be easily done by using:
- r~17 purple cabin with +20 block & +20 res
- r~17 purple core with +20 block & +20 res
- r~17/18 purple arms with +~80% to 1h combat weapons & +~26 block (arm has also ~14 base block)
- any adv 5/med 3 shield, they include +30 base block
Adding the block of all parts should get you around 10x, which is pretty much all you need.
However, note that the arm only gives a bonus to combat weapons. If you are using shooting ones, you will be better off with the block one, since you can combine it with a r19 part and get even more bonus stats.
Im still not sure of how much res can the build achieve, so far I can guess that around 167-207 might not be impossible, since:
- the r~17 purple core and cabin ll give you +40 base res total
- The cap for shield res parts is 45 I believe, assuming both the body & engine reach it, then that's another +90 res total (130 total)
- the r7 shield hardeners from cs give +25 res (155)
- the res jetpack gives +12 (+167 total res)
That should cancel out around 89% of the damage the shield receives, without counting the base resistances from the shield, which give +~40 to 2 specific types (for each shield there are 2 versions of it, each giving res bonus against 2 of the 4 damage types). For some reason, shields seem to keep their resistances active even while their durability is at 0 (which means the shield is "dead"). I don't know if this is a bug or not.
Note that endgame shields only have about 5k durability. With purple parts + research though, you should be able to get an additional 10k durability or more, without even counting the enhancers.
One "advantage" the build gets, is that you can swap shields mid-fight, and the new one will be at full health (as long as it was at full health before starting the fight, of course). The damaged shields in your inv will not recover until you are out of fighting mode though, but if you carry many shields in your inv, you can go swapping between them as you need. There are no regular repair packages for shields though, only cs ones.
Subscribe to:
Posts (Atom)
